Information Pages

Wednesday, June 29, 2016

My Ideal Herb + Veggie Garden

Now that the courtyard garden is finished we have a big raised corner garden bed that we are going to plant out with herbs and veggies.

I love to cook with fresh herbs and have an ever growing list of must have herbs for the garden which looks something like this Basil, Mint, Parsley, Oregano, Coriander, Rosemary and Thyme.


Plus easy to grow veggies like Rocket, Cherry tomatoes, Spring onions, Chillis and a Lime tree to name a few!

I had a lemon tree for about 3 years which sadly didn't product any fruit so I'm hoping I'll have more luck with a lime tree.


Before we cleared and subdivided the backyard we had a herb and veggie garden and I loved being able to pick fresh herbs at dinnertime or cherry tomatoes for my salad and I can't wait to grow our own produce again.

I'm really looking forward to planting out my dream herb and veggie garden in the coming weeks.

What's your favourite thing to grow in the garden?


 photo F0F68C01A59FABD46732FC15E1D8816D_zpsc6047f2f.png

For exclusive extras and daily updates ... follow Jarrah Jungle on Facebook, Instagram and Twitter


[Images via my Pinterest 1, 2, 3, 4, 5, 6]

Monday, June 27, 2016

Honeymoon Travels: Los Angeles, California USA

Today I'm sharing part six which is the very last stop of our honeymoon travels around the USA.

After New York, Louisville, New OrleansLas Vegas and San Francisco our last stopover was a very short flight from San Francisco to Los Angeles, California.

This was just a 24 hour visit before we flew back home to Australia and we stayed at the really funky Farmer's Daughter Hotel which I picked because it was close to where our tour would pick us up from at the Farmers Market in Downtown LA. The bar, restaurant and pool area was awesome too. I wish we had more than one night at this hotel as it was one of my favourites.


We wasted no time once we'd dropped off our bags at the hotel, we walked to the nearby Farmer's Market where our sightseeing tour was picking us up from in the afternoon. We had a look around the markets and got the last of our American souvenirs and gifts and had a delicious lunch.

Then we went on a half day Legends Of Hollywood Tour and we were the only 2 people on the tour for the day which was interesting! The tour was on a small private van with a TV screen showing the movie scenes of places as you drive by them and the driver tells stories and points out all the interesting places as he goes as well - it was a really interactive tour.


From Downtown LA we drove around town, into the Hollywood Hills to see the homes of the rich and famous and a photo stop near the Hollywood sign. 

Then onto Beverly Hills, Sunset Strip and Rodeo Drive, and all the sights seen on the movies along the way. Unfortunately there were no celebrity sightings for us that day!


I would have liked to go down to the coast and driven ourselves from San Francisco to Los Angeles but we simply didn't have the time to do that ... maybe on our next visit (I am already thinking about what to see on our next trip to the USA!)

The next day we caught two long haul flights home back to Perth and what should have taken 23 hours of flying ended up taking 30 hours which was not pleasant I can tell you! Because of the delay I did manage to get a small refund from the airline Cathay Pacific though which was good!

So that was our three week honeymoon adventures around the USA .... I loved every part of it - the people, the food, the culture and history, the sights we saw and the things we did, we have many memories and moments to smile about it was an amazing honeymoon.


Have you been to Los Angeles? What did you love about it?


 photo F0F68C01A59FABD46732FC15E1D8816D_zpsc6047f2f.png

For exclusive extras and daily updates ... follow Jarrah Jungle on Facebook, Instagram and Twitter


[All images my own]

Wednesday, June 22, 2016

Craft Room Update: Drawer Organising + Storage

I have renewed enthusiasm to be creative and crafty since getting my Happy Planner which I am using like a scrapbook journal. This in turn has made me tackle my messy un-organised craft room and turn it into a creative space that I want to spend time in and create things.

I shared with you recently a gift wrapping station and greeting card box that I created for my craft room and today I'm sharing another project on tidying and tackling my messy and disheveled craft room drawers with some inexpensive drawer inserts and baskets from Kmart.

This sweet and pretty chest of drawers may look innocent from the outside but on the inside it was hiding a magnitude of sins ...


As you can see the shoe box lids were just not working to hold and organise supplies and I needed some proper drawer inserts and dividers to store everything neatly. So I went to Kmart and stocked up on some drawer inserts and storage baskets and got busy organising everything. 

I pulled the drawers out, emptied them and wiped them clean, lined them with pretty drawer lining paper and then slowly started sorting - you can see here one drawer is being sorted while the other sits in waiting!


I now have one drawer just for my sticker collection - I sorted the stickers into categories (modern, kids, typography, borders, Christmas, planner etc) and placed them into the storage trays. The large sticker sheets I cut to fit which makes it easier to see what I have. 

The other drawer has pretty papers, fabrics and embellishments stored in little baskets and bags keeping them all organised. 


It looks so much better now that I can see what supplies I already have and what I need to stock up on (a girl can never have enough stickers in my opinion!). 

It's going to make using my Happy Planner a lot easier and I've made a few handmade greeting cards so it's already inspired me to be creative with my pretty craft supplies now that I can see what I have.


This little organising project cost me just over $25 but it has made the world of difference to me feeling creative and being organised and inspired!

How do you organise your craft supplies?


If you are a fellow crafter or would love your own Happy Planner and join Blitsy a one stop shop for discounted craft supplies and make a first time purchase it would be awesome if you use my referral code HERE when you sign up - you will get great discounts and I get a $10 reward to spend on my creative obsession so I can share more posts like this with you guys! Thank you!!

 photo F0F68C01A59FABD46732FC15E1D8816D_zpsc6047f2f.png

For exclusive extras and daily updates ... follow Jarrah Jungle on Facebook, Instagram and Twitter


[All images my own]

Monday, June 20, 2016

Subdivision Update: Planning Retaining Walls + Dividing Fences

Since my last update on the subdivision of our block once we finished clearing the land we had the surveyor back to measure and peg out the two new sized blocks - our new backyard for the front house and the new subdivided block.

The next step is to build retaining walls and fences around the two new sized blocks and when that's done that will finalise the subdivision and our local council will issue us with new plans and title.

With dividing fences and retaining walls you need to co-ordinate with your neighbors and come to an agreement about cost sharing, materials, etc and this is where it got a little tricky for us .... We have spoken to our neighbors on all three sides of our boundary and wrote nice friendly letters to them, attaching quotes and asking to build retaining walls and new fences and split the cost between us. But unfortunately we haven't had the go ahead from all of our neighbors ...... Bummer!


We got the go ahead from our neighbor on the right side who is also subdividing their block and happy to go halves in the cost of a limestone retaining wall, removal of the old fence and installing a new dividing fence.

We have started work on this over the weekend with the old fence being removed and a limestone retaining wall being built (this is the high side of the land where we built a garage). The retaining wall will join up with the brick garage wall and follow it down to the back fence. A new fence will be installed on top of the retaining wall this week.


The neighbor on our left side agrees we need a new dividing fence but we haven't yet decided on the type of retaining and fence. We are sourcing further quotes and options and hope to come to an agreement soon.

As you can see this fence is really old, made of asbestos and falling down - I can't wait to replace it!


The neighbor on the back fence has a newer cement fence and has agreed we can put in a new fence and retaining but at our own cost and has put some conditions on how we go about it. We have considered this further and decided to leave this fence alone as it's a newer fence, in pretty good condition and in the right position so we don't need to retain or put in a new dividing fence here. This will save us quite a bit of money too! 

Because we are perfectionists we will probably paint this fence in classic cream so that it matches our new cream metal fences.


For the fences we are going for Colorbond metal fence panels in a cream colour to match the exterior colour pallete of our home. Below is a close of up the pattern and colour.

We have a local company Pillar To Post Fencing installing the fences.


For the retaining wall on the high side we are going to use limestone block retaining to match the foundations of our house and the front courtyard we built - whilst limestone blocks are the more expensive option it will look really good, it's quality and will last a lifetime. We have P+P Stone Solutions who built our front limestone courtyard doing this work for us.

Being able to split the cost with neighbors is really good but firstly you have to agree to what you want. So fingers crossed we can get our neighours agreement soon!

I'll share a progress post on the new retaining wall and fence going in very soon!


 photo F0F68C01A59FABD46732FC15E1D8816D_zpsc6047f2f.png

For exclusive extras and daily updates ... follow Jarrah Jungle on Facebook, Instagram and Twitter


[All images my own]

Wednesday, June 15, 2016

Courtyard Garden: Pebble Garden + Rain Chain Project

Since the paving and grass was laid in the courtyard Mr P and I have been impatiently waiting for a run of warm sunny days so that the limestone pavers will dry out enough for us to seal them BUT it keeps raining every few days! Damn you Winter!!

We can't put any pot plants or furniture on the pavers until they are sealed because we don't want to risk staining the pavers or marking them.


It's taking all my restraint not to put out the new outdoor furniture and set it up all nice with a side table, outdoor lanterns, candles and decor.

I picked up two of these double acapulco chairs for a steal at Kmart a few weeks ago (similar to our blue chairs) and they were just $29 each! I also grabbed a few outdoor cushions as they were just $6 each. Bargain Queen strikes again!!


So we've decided that there are some projects we can go ahead with 
and do now that will keep us off the pavers ....

We can plant out the pebble garden bed as there's no risk of us staining the pavers if we cover it with plastic as we work. 

We are on the look out for some large feature pots to go into the garden bed, hardy plants to take the full sun and little water and then we'll fill up the garden bed around the pots with pebbles.


Another project we can tackle now is to finish our rain chain feature.

We put this in because the new down pipes on either side weren't coping when it rained heavy so the roof plumber suggested we install a rain chain which is basically a hole in the gutter with a chain attached so the rain follows the chain down into a feature pot and the pot is connected to drainage and goes directly into a soak well.

I will share a full How to on installing a rain chain once it's finished and looking good!


I can't wait to get out into the courtyard and tackle these projects this weekend!

What's been happening in your garden lately?


Sharing with link parties:
The Dedicated House - Make It Pretty Monday
Curly Crafty Mom - The Creative Corner
Savvy Southern Style - Wow Us Wednesdays
The Plumbette - Home Improvement Thursday


 photo F0F68C01A59FABD46732FC15E1D8816D_zpsc6047f2f.png

For exclusive extras and daily updates ... follow Jarrah Jungle on Facebook, Instagram and Twitter


[All images my own]

Monday, June 13, 2016

Book Review: Darkest Place By Jaye Ford

This is a book review of Darkest Place by Jaye Ford that was published by Random House Australia on 1 February 2016.

Jaye Ford is an Australian author who decided at 40 that her dream to become an author would never be realised until she sat down and finished writing something and 10 years later she published her first crime book and has published four more since then plus a romantic comedy. Jaye lives in Lake Macquarie, New South Wales with her husband, two dogs and a backyard vegetable patch.

This is the second crime novel I have read of Jaye's and she is fast becoming one of my favourite Australian authors - you can find my review of her previous novel Already Dead here.


This is a psychological thriller about Carly a young woman who has moved from country NSW to Newcastle to start a new life on her own, focus on her studies and try to deal with the grief of losing her best friends many years ago.

The story is set mostly around Carly's new home a modern warehouse apartment. Carly thinks her place is being broken into but with no evidence of a break in, the police, Dr and neighbors start to imply it's all in Carly's mind. This also makes the reader question whether Carly is making it up or if it's actually happening.

The setting never strays far from the warehouse as this is the main focus of the story which builds momentum as it unfolds and it's a fast paced race to the end to see what happens.

The writing is easy to follow and I warmed to all of the characters they were described well and fit into the story brilliantly (as well as becoming suspects!) and a sexy romance added a bit of spice and interest too.

I recommend this book to suspense and Jaye Ford fans .... but you might want to read it with the doors locked and the lights on!


I give this book 5 stars out of  5

Jarrah Jungle's Star Rating:
1 Bad - I'd rather eat brussel sprouts topped with anchovies than read this again
2 Not Good - I'd rather watch paint dry than read this again
3 Ok - I'm sitting on the fence - its not great but not terrible either
4 Good - I'd give up a bottle of the worlds best champagne for this read
5 Great - I'd pass up a date with Johnny Depp for this read


Darkest Place can be purchased from the author here and Random House Australia


Sharing my book review on Good Reads here and Netgalley


Disclosure:  NetGalley partner with bloggers such as me to help promote authors and their books and I was given this ebook published by Random House Australia to review. As always, all opinions are my own.


 photo F0F68C01A59FABD46732FC15E1D8816D_zpsc6047f2f.png

For exclusive extras and daily updates ... follow Jarrah Jungle on Facebook, Instagram and Twitter


[Image via Random House Australia

Thursday, June 9, 2016

DIY Wrapping Station + Greeting Card Box For Under $50

With my latest obsession with my Happy Planner and wanting my craft room to be a creative space I have been inspired to give my craft room a spring clean and tidy up.

For under $50 and a few hours over the long weekend I created a very organised and stylish wrapping station and I also made my own greeting card gift box which I am completely in love with! 


Now there are lots of before photos here along the way so you can see for yourself how much of an improvement proper storage has made.

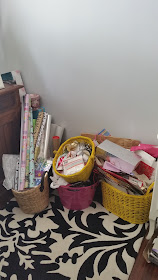
My gift wrapping supplies were a hot mess stored in open baskets, everything was just tossed in there and it wasn't working for me, it looked messy and I could never find anything. It was safe to say I had well and truly out-grown my wrapping station as it was!


A weekend trip to Kmart and I loaded up the trolley with some great storage products. These gorgeous blue rattan style storage tubs with lids and a few medium and small size baskets (the drawer inserts I'll be sharing in a separate blog post about organising my craft supplies). 

The flat and square tubs are $8 each (I got 5), the medium baskets $2.25 (for a set of 2) and small baskets $2.25 (for a set of 4) - I spent a grand total of $44.50 (see cost breakdown at the bottom of the page).


I sorted through each basket, throwing out anything damaged or I knew I wouldn't use and packed them neatly into the tubs.

The two large tubs were perfect for all sized boxes to sit inside.


Sheets and scraps of wrapping paper sit nicely in the medium tub and makes it a million times easier to see what I have so that I don't keep buying wrapping paper when I don't need to! 

I also store leftover wallpaper in here as it's great to use for card making or gift wrapping.


The gift bags of all shapes and sizes were packed into a medium tub with Christmas on the bottom (as it's only used once a year!) and all the other bags on top.

I also did a separate smaller tub for bottle gift bags and material sacks and bags.


The ribbons, string and gift toppers were all kept organised inside the medium and small baskets. 

The baskets then sit inside the large tub perfectly.


So I know what's in the tubs I stuck some Avery removable labels to the front ....

From the bottom to top there is: Boxes, Bags, Ribbon, Bags and Wrap paper.


The wrapping paper rolls sit inside an Ikea bin and then inside a basket which holds them securely. 

I also keep my leftover wallpaper rolls and postal tubes here.


Now as for my greeting cards and gift tags these were all dumped in a drawer and I could never find anything.

I saw this fabulous idea from I Heart Organising for greeting card storage in a box - but I needed to find a box tall enough to store the cards with the lid on to keep the cards from getting dusty and damaged.

I bought some Ikea boxes over 5 years but never assembled them and so I put Mr P to work (bribed with a beer and watching footy on the telly!) to put the boxes together for me. Turns out they are the perfect size, plenty of height to fit even the tallest of cards and the box is really quite strong too - not to mention the adorable stripes!


To create the greeting card storage box I made my own dividers by cutting some black card in half, adding a post-it note tab and writing on the tab the category of card. 

Then I sorted the cards into each category and put them into the box with the dividers between them.

As well as card category sections there is a section for envelopes, DIY blank cards for my card making and a section for gift lists where I keep a list of all Birthday and Christmas gifts given including the budget as it makes buying gifts each year a lot easier as I know what I've given previously.


This was so easy to make and has made such an impact on being organised - for a simple project it has made the world of difference for a card lover like myself as I can see at a glance what cards I have and what I need more of.

The best bit is it cost just $3 to make (for the card) as the box and tabs I already had.


Finally, I have stored all my invitation products like labels, invites, etc (mostly leftover from my engagement stationary and wedding invitations) in the other Ikea box.

The red/white box on the bottom has more boxes inside and will be used to give a gift in eventually!


I am so happy with my craft room makeover and so excited to use my wrapping station.

What's even better is that I didn't need to spend a lot of money to get organised and this whole set up with the wrapping station and greeting card box cost less me than $50.

Cost breakdown:
3 x flat rattan style tubs, Kmart $24
2 x medium rattan style tubs, Kmart $16
Medium basket set of 2, Kmart $2.25
Small basket set of 4, Kmart $2.25
Card to make dividers, Discount store $3
Post it note tabs, already had
2 x Ikea boxes, already had
Basket and bin for wrapping papers, already had
Avery labels, already had
Total: $47.50


Sharing with link parties:
The Dedicated House - Make It Pretty Monday + Before And After Wednesday
Curly Crafty Mom - The Creative Corner
Savvy Southern Style - Wow Us Wednesdays
The Plumbette - Home Improvement Thursday


If you are a fellow crafter and join Blitsy a one stop shop for discounted craft supplies and make a first time purchase it would be awesome if you use my referral code HERE when you sign up - you will get great discounts and I get a $10 reward to spend on my creative obsession so I can share more posts like this with you guys! Thank you!!


 photo F0F68C01A59FABD46732FC15E1D8816D_zpsc6047f2f.png

For exclusive extras and daily updates ... follow Jarrah Jungle on Facebook, Instagram and Twitter


[All images my own]