Related Posts Plugin for WordPress, Blogger...

Wednesday, June 12, 2013

Creating Our Own French Doors Package

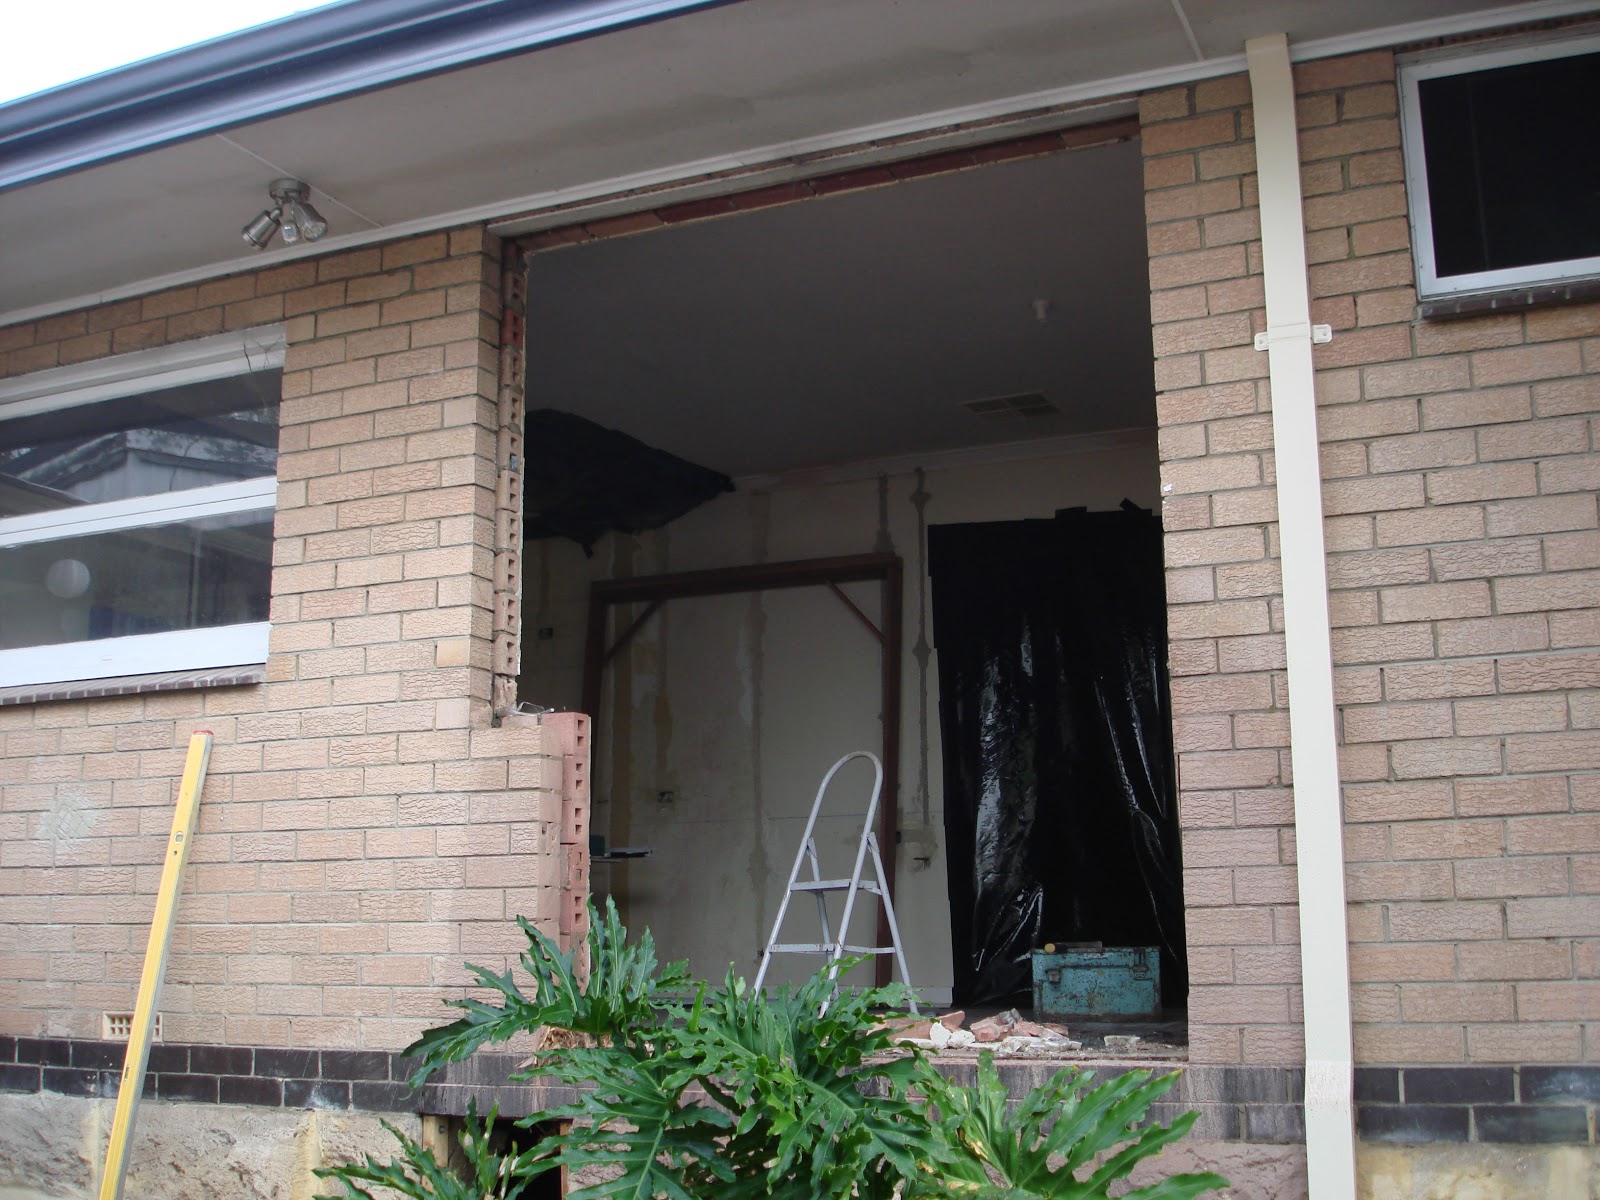
Finding doors for the new doorway we created when we turned the dining room window into a  doorway has been a bit of a challenge. But that's ok I'm not afraid of a challenge I like to think of it as an adventure!
 
We checked out the few companies in Perth that sell french doors and in the most popular store where they offer an $1889 package 2 french doors installed and ready for painting or staining we were not really impressed. They only had one style of doors to chose from and honestly the quality of the door didn't feel that great so I asked if there were any other doors to pick from that are a bit more solid I was told no everybody buys these ones and this is all we have .... Ok well I'm not everyone and I want a better door than that! Of course I'm too nice to actually say that out loud but I left deflated all the same.
 
Not the actual doors we saw but close enough!
 
So we decided to create our own door package - find doors that we like with frosted glass for privacy and solid quality for a budget of $1500. You can see my cost breakdown at the bottom of this post.
 
We have a carpenter friend who made up a timber frame with metal step to the exact measurements we needed for $200. He also came and hung the 2 doors at a cost of $400 for the day. It's pretty tricky hanging 2 doors together as they need to be absolutely perfect, it takes time and skill so we were happy to leave this to someone with those talents. We also had our brickie help us cut the door frame out and brick it up which cost us $300 for half a day which again was well worth it for the work that was done.

The custom made timber door frame (laying side ways as it's too tall to stand upright)
 
The doors themselves we found are seconds doors so have some small imperfections but are otherwise fine. We got the doors for $50 each they don't call me the bargain queen for nothing!
 
The 2 doors we scored for $50 each
The reason they were a bargain is they have no glass in them so that was our next task.  We got 3 quotes from glass companies - clear glass is the cheapest but I need some privacy when I'm doing my nudie run to the loo in the middle of the night! So we opted to pay the extra and go for frosted glass which is 2 layers of safety glass bonded together and the frost applied to one side. Modern Glass came out the cheapest and we chose their Modern Etch glass so it will let the light in but offers privacy so people won't be able to see in.
 
The types of glass from Modern Glass
We measured the door inserts and then measured them 3 more times to be sure, before placing the order with Modern Glass for the 10 pieces of glass for the 2 doors. The cost for both doors was $260 which was almost half the price of other quotes. It really does pay to shop around!

Checking the glass fits

The door frame we painted white as all the window and door frames in the house are white and it means the timber doors will really stand out and be the feature. The frame got a light sand then 2 undercoats of white paint with a light sand between coats. Once the doors are hung the frame needs 2 more coats of paint, the reason we didn't completely paint it before is we knew it'd get a bit scratched when the doors went in.

Painting a white undercoat on the door frame

The doors themselves we want to keep the timber look so stained them. We used Sikkens Filter 7 Light Oak - it's meant to be a 3 coat process using both the Filter 7 and HLS but we heard a tip that you can dilute the Filter 7 with turps so you don't need to buy the HLS. This is because the turps allows the stain to penetrate the wood.  So we got away with 1 coat of diluted Filter 7 and then 2 top coats of full strength Filter 7 straight from the tin.

It was 16 hours drying time between coats which meant it was a 3 day job to stain them completely. The first coat took a lot longer to dry probably because we used the turps so this needed a full 24 hours before we applied the next 2 coats. The stain came out really well but was pretty tricky on the wooden beading as they're so small and fiddly.

1st coat going on - a mixture of Filter 7 and Turps

2nd and 3rd coats going on - this time full strength Filter 7

Now the doors were stained and dry they were ready to be hung. They were sanded and planed back until they fit perfectly in the frame and closed evenly together. This took more than a few times of hanging the 2 doors and then taking them off again and planing them some more. Even though the room was taped up and doors were closed my house had a fine layer of saw dust all the way through it which kept me busy mopping, dusting and cleaning!
 

Both doors were planed and sanded until they fit perfectly
 
Hanging the doors and attaching the hinges
 
The doors hung .... now to dress them
 
Once the doors were hung properly we fitted the glass to the inside panels by removing the wooden beading, putting silicon all around the inside panel to help the glass stick and then slipping the glass in and putting the beading back in using a nail gun to nail the beading in place. This was a little scary first time using a nail gun and I kept praying that a nail wasn't going to shoot through and crack the glass. Or me. Eeeeek!
 
Silicon around the frame then slipped the glass in
 
Put the wooden beading back in to hold the glass
 
Out came the nail gun to nail the beading into place
 
1 door done and 1 to go

We put 2 different sets of door handles on - a lockable set on the door that will open the most and a dummy set on the fixed door. They are all brushed silver handles by Gainsborough in the Tri Lock Series which means they have 3 ways of locking including a built in deadbolt for extra security. We bought the locks with the seconds doors and they were all in the original packaging and like new for less than half the normal price at a saving of $100 each handle.
 
Making progress with the glass
 
We had to plaster around the door on the inside to cover the bricks and shape the door frame. This took quite a while as it was a first attempt at rendering a door frame and not something Mr P does for his day job! He was also working by lamp light because the electricity was cut days before in this room in preparation for the new electrics to be installed. He did a pretty good job in the end even though we didn't put the tools down until midnight!
 
Plastering over the bricks and around the door frame
The top of the frame was the hardest part to shape and plaster
The new doors make a huge difference to the amount of light that comes through it really brightens up the house which I'm loving.  Let's take a look at the progress so far ...
 
Before - window in dining area

During - door way cut out
 
Now - Doorway with french doors ... next job is painting!
We saved almost $500 doing the doors ourselves but it's more than that because we got a better quality product and it was custom made with the type of glass we wanted. So folks, shop around for doors second hand and you'll be surprised what people don't want anymore ... one persons trash is your treasure!
 
Cost breakdown:
$200 - Timber Frame - custom made
$100  ($50 each) - Timber Doors
$260  ($130 each door) - 10 panes of Modern Etch Safety Glass
$75    ($50 and $25) - Gainsborough Tri Lock Handles
$28 - Paint for door frame
$37 - Sikkens Filter 7 - Light Oak Stain for 2 doors (with some left over)
$300 - Labor for our brickie to cut doorway in and brick up
$400 - Labor for our door carpenter to hang 2 doors and install locks
$1400 TOTAL

As you can see there is still a bit of work to do before the kitchen renovation is finished but we're getting there from what it looked like before to where it is now.

For updates on the kitchen as I go Like Jarrah Jungle on Facebook and you'll never miss a thing!

Sharing with link up parties
Wow Us Wednesdays at Savvy Southern Style
Make It Pretty at The Dedicated House

 
[1st images Doors here, 2n image Glass here all other images my own]
 
 
Pin It Now!

Tuesday, June 11, 2013

Book Review: 82 Modern Style Ideas To Create At Home by Karen McCartney

I came across this cool little creative read in the library recently - 82 Modern Style Ideas To Create At Home By Karen McCartney.
 
 
The Australian Inside Out magazine has published a book with 82 of their creative design and decor projects from the magazine. There are also a few bonus projects that haven't been published in the magazine before. Here are some of my favourites ...


This book was really easy to flip through as each project covered a 2 page spread - a page for the photo and a page for the instructions on how to create the project.

The writing was simple and the content ranged from easy projects that only takes a few hours up to more difficult weekend projects.

I would recommend this book to Inside Out and home decorating magazine fans looking for some inspiration.

I give this book 3 stars

Jarrah Jungle's Star Rating:

1 Bad - I'd rather eat brussel sprouts topped with anchovies than read this again
2 Not Good - I'd rather watch re-runs of Neighbours than read this again
3 Ok - I'm sitting on the fence - its not great but not terrible either
4 Good - I'd pass up a pack of tim tams for this read
5 Great - I'd pass up a date with Johnny Depp for this read


[All images my own] Pin It Now!

Sunday, June 9, 2013

The Perfect Beer Batter Recipe

Unfortunately this isn't a meal I can make in my makeshift kitchen the garage but it won't be long until I'm cooking in the new kitchen! This is a recipe I made a little while ago and want to share because it was delicious.
 
I was always a bit hesitant to make beer battered fish for fear it's not too healthy and would be heavy and oily. But I'm glad I tried this recipe, surprisingly it was light and fluffy because of the yeast in the beer and the batter was crunchy and tasty.
 

Deep-Fried Fish Fillets in Beer Batter Recipe
(In The Kitchen Cookbook by Allan Campion and Michele Curtis)

Ingredients
250ml (1 cup) beer  ... you can finish the rest!
2 tbsp olive oil
1 egg
170g (1 cup plus 1 tbsp) plain flour
pinch of salt
500g firm white fish fillets   ... caught fresh by my big brother, thanks bro!
seasoned flour
oil for deep frying

Method
Whisk together beer, oil and egg.
Sift flour and salt and add to beer, whisk until smooth.
Set aside for 30 minutes.
Heat up oil in saucepan for frying.
Coat fish in seasoned flour, then batter, allowing excess to drip off.
Ease fish gently into hot oil and cook until golden, turning fish over once.
Drain on absorbent paper and sprinkle with salt.
 
Serve with lemon wedges, a green salad and chips - don't be naughty like me and have frozen chips, make your own hand cut oven baked chips tossed in olive oil, sea salt and dried mixed herbs.

If you're like me and afraid of this being an oily dinner don't be, it was delicious!
 
[Image my own]

Pin It Now!

Friday, June 7, 2013

The Epic Week Of The Kitchen Install

The new kitchen was installed this week after gutting our old kitchen 6 weeks ago.

Luckily last weekend was a Long Weekend because it was so hectic trying to get everything done before the new kitchen was delivered ... we didn't put the tools down until midnight. It's amazing what you can do when you know you have to although I felt like I was on The Block the tv show and fighting against the clock!
  
On Monday the French doors were hung in the dining room (post to follow soon) and it was late afternoon before we could then get into the last of the jobs to be done before the kitchen was delivered the next day. We had to plaster around the new doorway and walls, sand off the old suede effect paint off the walls, re-install the skirting boards and quarter round, find a new door frame for the kitchen door which we managed to do by using the old pantry door frame which was the perfect fit (just like we used the pantry shelves for floorboards), and finally clean up and give the floorboards a coat of tung oil where the cabinets will be placed and then we'll give the entire floorboards a proper coating once all the kitchen is in.

On Tuesday the cabinets were delivered already assembled and put into the kitchen area.
Doing a happy dance around the kitchen cabinets!
On Wednesday a kitchen installer organised by the kitchen company spent the day putting the cabinets in place, the top pelmet and contrasting kick boards. It was so exciting to see the design come to life and it just kept getting better with each cupboard being screwed into place.
Glass wall units installed
Cabinets being installed
Handles and kick boards on
They also measured the stove and sink so they could cut the granite bench tops but unfortunately the sink we bought was out by just millimetres .... we had measured the whole cupboard instead of just the inside of the cupboard oppps! So there goes my plan for the 1.5 sink and I had to settle for a single basin. We did a 8pm run to Bunnings and picked out a single basin sink ironically in the same style I wanted in the first place with a shell pattern on the drainer - this was my first pick for 2 reasons, 1 my nickname is Shell and 2 there is shell in the granite .... It's a no brainer really! When we got the sink home we realised it would work better with the drainer on the other side so I set my alarm early to return the sink the next morning before they arrived with the bench tops.
On Thursday morning I woke early and sculled my espresso like it was a shot of vodka then took off to sort out the sink, the first store didn't have the style I wanted in stock so I drove to the next one praying and trying not to get stressed out in peak hour morning traffic driving around in the rain with fogged up windows Grrrrrrrrr! Anyways I got my sink and got it home in time so it all worked out in the end.
Later that morning the kitchen guys came out to measure up the new sink so they can cut the granite off site in their workshop. The sink will sit perfectly centred on the kitchen window and in hindsight will give me more bench space so I'm happy with the single sink. It was worth the drama it looks fantastic.

The 1.5 sink didn't fit ... bugger!
We got the Clarks single basin sink with drainer on the left but then swapped it for a drainer on the right
Shell pattern drainer - my nickname and a nod to the shells in the bench top
When I got home from my morning sink saga the electrician was waiting in the driveway for me he'd messed up his days and come a day early. Luckily we were organised and had bought all the lights ready for him - I managed to make some decisions from my Lighting Inspiration and a big thank you to everyone for your advice on lights.

We had installed all new electric conduits and electric cable in the place where the power points would go so they were ready for the electrician to connect everything. He was here for 8.5 hours can you imagine how expensive it would've been if he had done the work from scratch. Plus I put the pendant light together which took me about 3 hours with frustration breaks in between so that would've been even more labour costs!

Here's a tip: Always have your lights assembled and ready to be installed by the electrician to save time and money. 

We cut in the electrical conduits, pipes and ran cable ready for the electrician
Light for the island bench - Lennox 3 light pendant from Beacon
LED Downlights for the kitchen area - LEDlux Downlights in cool white from Beacon
The electrician connected up the power points for the bench tops and all the appliances.

He connected the 4 LED lights in the glass cabinets (which were fitted by the cabinet installer the day before).

He helped me decide where to put the 4 LED ceiling lights in the kitchen so they shone onto the benches and didn't cast shadows as that would drive anyone crazy.

Finally the pendant light over the kitchen island was installed, this had to be perfectly centred over the island and while I spent hours putting it together it was just as fiddly to install because the heights had to keep being adjusted until it looked right.

He also connected the oven which is now ready to use.
4 LED lights and pendant light
Glass cabinet lights have 4 LED lights inside
On Friday the granite bench tops finally arrived - unfortunately they tried to come yesterday but snapped the sink bench trying to get it into their trailer so they had to cut another piece. I was a little worried because we had picked out 2 pieces of granite and I didn't want to end up with a piece that was different but they picked a piece of granite from the same batch so it matched.
We picked out our 2 pieces of granite the weekend before the install
The granite bench tops were delivered in 5 pieces pre cut to size
3 for the sink bench, 1 for the stove/oven bench and 1 for the island

This corner piece of granite was really tricky to get in and some of the cupboards and doors had to be removed to fit it
Next piece of granite fitted for the sink
Final pieces going together like a jigsaw
The island bench top on with a longer overhang at the back for bar stools to sit under

The oven / stove side bench top going into place

Oven / Stove bench in levelled and sealed

Granite benchtops installed and looking beautiful

I have had tradies going in and out of my house for 4 days .... there is dust, sand and footprints everywhere but I couldn't care less. I keep offering them red cordial and strong coffee and I'm just so happy it's getting done.
Now the kitchens installed we can move onto the next jobs - picking out and installing a splash back (I think I'm going to go for tiles over glass splashback), then buy and fit the range hood, the sink and plumbing needs to be hooked up, the dishwasher installed, the gas stove top installed, prepping and painting all the walls, skirting boards, door frames, and ceiling and finally the ceiling cornices can be installed.

Phew then the fun stuff - shopping for bar stools, a dining table and bench seat, a rug and some wall art and finishing touches.

It's about that time I'm just going to go pour myself a wine and stand in my newly renovated kitchen that's slowly coming together .... Cheers!

For updates on the kitchen as I go Like Jarrah Jungle on Facebook and you'll never miss a thing!


[All images my own]
Pin It Now!

Thursday, June 6, 2013

How To Survive Meal Time When Renovating The Kitchen

I wrote some menu ideas of meals I could cook over the 6 weeks I'd be without a kitchen and stuck it to the fridge for those nights when I was a bit daunted about how I was going to satisfy two rumbling tummys come dinner time.

Turns out we survived much better than I thought we would. We've only gone out once a week for dinner and even entertained friends and family a couple of times and apart from a few "It's just like camping" comments it all went well. There was a lot of wine and beers consumed at these dinners too so that probably helped!


Turning the laundry sink into a washing station and the garage into a makeshift kitchen really worked because they are all close together and fairly easy to go from one space to the other. Plus keeping the oven/stove plugged in until the last week when we redid the electrics so I could still use it in an otherwise demolitioned kitchen space definitely helped.

The main thing was cutting down on the preparation at meal time because bending over chopping on a little outdoor table that wobbles with each cut is not the most comfortable way to prepare a meal. I've succumbed to frozen vegetables so I don't have to chop which has helped too. And tried to keep meals simple - peeling prawns in the laundry sink was not a simple meal not sure what I was thinking there for my Special Fried Rice! But it's experiences like these that will make me appreciate the new kitchen even more :-)

I don't normally buy frozen meals but a few frozen pizzas landed in my trolley for those lazy nights when I didn't feel like hanging out in the garage under the fluro lights chopping vegetables. But I wish I hadn't I was so disappointed with them, there's just no substitute for making your own bases and creating your own pizzas so I'll be glad when I can skip the frozen section again!

I stocked up on tinned soup thinking it'd be an easy mid week meal that just needed reheating in the microwave. Man was I wrong they all tasted so processed and salty there's nothing like a fresh pot of home made soup. I've tried to make a pot of soup like my tasty Man Soup every weekend in my slow cooker which has been a nice lunch on these cold days and an easy dinner served with fresh bread lavished in butter or cheesy toasted sandwiches.


As I thought my sear and slow cooker was used quite a bit on the weekends because I couldn't use the oven/stove with most of the work being done in the kitchen then. Some of the dishes I made were my easy but tasty Pea, Zucchini and Bacon soup, Spaghetti Bolognese and Chinese Chicken Hotpot. I also used the sear function on it as a fry pan to brown off onions and meat to make casseroles, stir frys, pretty much anything.

I was given a rice cooker for my Birthday which was perfectly timed because I've been able to use that heaps to make rice and use the steamer for veggies and made a Chicken and Pea Risotto using leftover BBQ chicken which was delicious and I didn't need to stand and stir it until I had a sore wrist that was a big winner!

The BBQ Weber has had a good work out on Sunday nights for a delicious roast dinner well earned after all the weekend renovations.
 

Honestly it wasn't as bad as I thought cooking without the kitchen but having everything organised so you can access it easily definitely helps come meal time.

How did you survive at meal time when renovating your kitchen?
  
[All images my own]
 
Pin It Now!