Related Posts Plugin for WordPress, Blogger...
Showing posts with label blinds. Show all posts

Monday, June 17, 2013

Guest Bedroom Styling

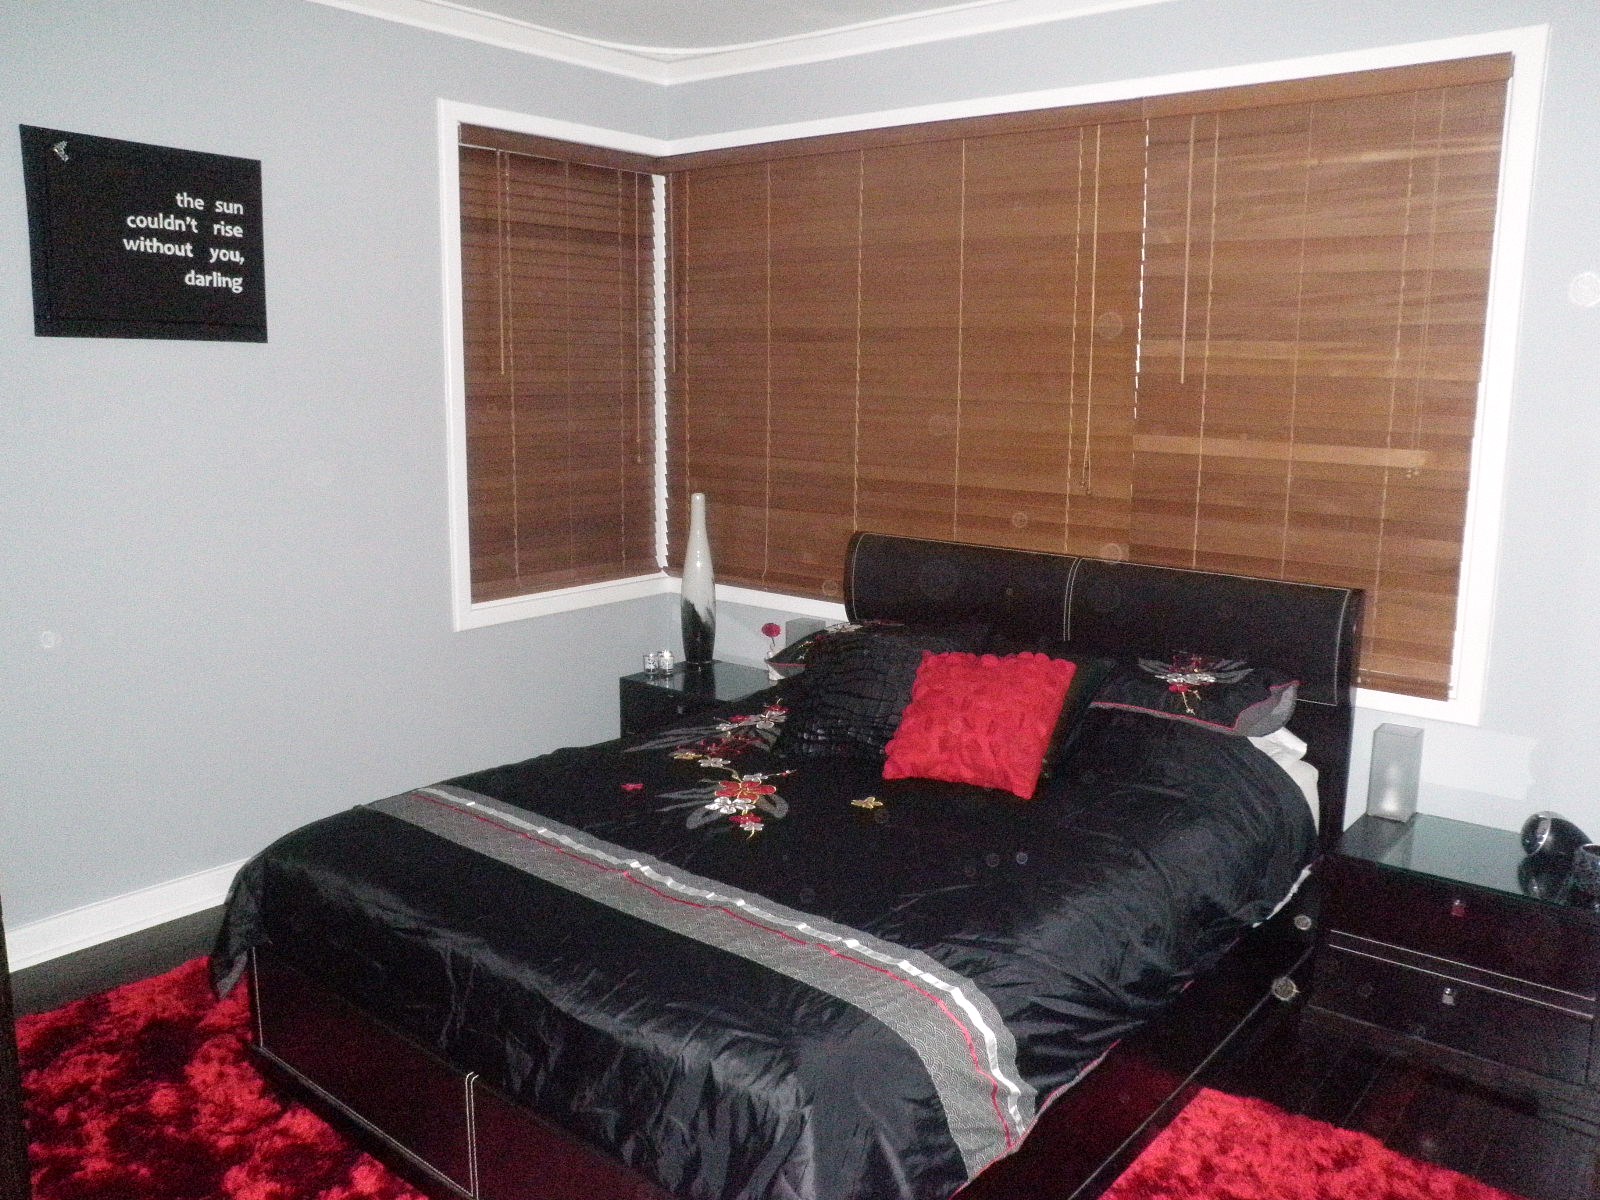
I really like the feel of my Guest Bedroom it's light and fresh and cozy and a great haven for friends and family who stay over like my lovely friend who house sat for me this weekend so Mr P and I could have a weekend getaway.

I change the art work quite a bit ... the current art was bought at a charity auction and was hand painted by kids in Cambodia and takes pride of place on the wall.


The block out curtains were a great investment they really keep the sun out and allow those with fragile hangovers to sleep in for as long as they like! The curtains were bought from the same place as the Master Bedroom curtains.
 

I'm forever changing the throw cushions depending on what colour scheme I'm going for. In fact there's a big pile three times this on the bed at the moment because I'm running out of room in the linen cupboard for them. Note to self: stop buying cushions!
 
 
I love how neutral this room is and all I need to do is change the bed spread and decor to totally change the look of the room. The pin up girl was from my pin up girl art collection I made for the Master Bedroom. The lamp is from Target and the candle holder a $3 op shop find.
 

The light fitting is my favourite thing about the room it has that retro vibe and puts a cool pattern on the ceiling when it's turned on.
 

I've been on the look out for ages for a mirror and shelf to attach to the wall ... if you find one please let me know!
 
You can see before and afters of the Guest Room here
 
[All images my own]
 
Pin It Now!

Thursday, February 21, 2013

Kitchen Design - L Shape Bench Vs Island Bench

Since our first quote for the new kitchen layout I've now had a second quote from the company who made our bathroom vanity.
 
We knew we wanted to get a kitchen quote from them as we love our bathroom cabinet and they have a great range of bench tops at a good price. The driving force was visiting a friend's place on the weekend who had their kitchen designed by these guys and it looked amazing, so we went and got a quote from them this week.
 
The planning was a bit more interactive than the first quote, the designer came to our house and took photos and measurements and threw out some suggestions while we were there. Then we drove back to his office (only 5 minutes away) and he put the measurements into the computer and played around with the cupboards and appliances bringing the kitchen to life in 3d on the screen.

The 1st design is PRACTICAL - More storage cupboards/drawers, an extra appliance cupboard and bigger pantry.

This 2nd design is PRETTY - It has less storage but a more open feel. It will also require us bricking in some of the kitchen window. The pantry is smaller and there is no appliance cupboard. The plus to this design is there is room next to the cook top to prepare and cook which is lacking in the first design.

This has totally thrown me the different designs and what is the best decision to make. To be practical and have storage for all my kitchenware or to be pretty so when it comes to resale in a few years time the kitchen will look more appealing and appear bigger. The Domestic Goddess voice inside me is screaming storage all the way ... I may not need so many different types of kitchenware but I have them and they need to fit somewhere!

The biggest difference that I'm battling with between them is the 1st design has an L Shape Bench which we have now Vs the 2nd design has an Island Bench which I've never had before ....

L shape bench
 
 
What I love about the L shape bench is it can fit 2-3 friends to sit up there and have a glass of wine and chat while I prepare and cook dinner on the bench in front of them. I love to sit there and flip through cook books or the laptop and watch Mr P cook.

The downside to the L shape is there is dead space in the corner which you can't really use the cupboards or the bench top because you need to lean over which just isn't practical for say the coffee machine, it would probably just be space for a fruit bowl or decor.

Vs

Island Bench
 
 
The good thing about an island bench is it would create a more open feel as you could walk around the kitchen from both sides of the bench. It would also create an extra cupboard in what would otherwise be dead space in the L shape and you could use the bench top easier for the coffee machine or the like as you could stand in front of it, instead of having to lean over.

The downside to the island bench is that it will seat probably only 2 people and there won't really be room for them to sit comfortably and me prepare food in front of them too.

Decisions, decisions, this kitchen planning really is full on but I want to take my time and think about the design before I sign on the dotted line!

What are your thoughts on L Shape Vs Island Benches?
Which do you find more practical?


[Images via Pinterest 1 and 2]

Pin It Now!

Sunday, February 3, 2013

Idea For Covering An Outdoor Railing

I saw a really clever idea for covering an outdoor sundeck railing on the Dear Genevieve show recently. You can view the episode here (although I'm having trouble downloading it!)
 
The team redesigned a couple's huge 30 foot sundeck overlooking a pool in rural New Jersey. A multi coloured cloth wall was created to surround the decks perimeter.
 
 
The rickety old wooden banister around the deck was transformed with fun and funky outdoor fabric. Before the sundeck looked similar to this image except not yet nicely painted.

  
This Tom Sumbrella bright striped outdoor fabric was chosen to cover the railing. I think bright colour fabrics are a must for the outdoors.
So this is what they did ... The top railing was removed and the fabric was stapled to the top of the bottom railing and then the top railing nailed back on. To keep the fabric from blowing around a cord weight was placed in the bottom of the fabric to keep it down. The fabric hung from the front so you could see only fabric and the view from the other side was of the railing legs with the fabric peeping through. The entire railing was also painted white to freshen them up.

This image is similar, except the fabric covered the entire railing.
 
 
My patio railing is in need of some serious TLC, it's covered in ugly brushwood and wooden lattice that has seen better days. I'm so tempted to steal Dear Genevieve's idea and cover it in some outdoor fabric and create a cloth wall.


I'm not quite convinced on how well outdoor fabrics really hold up against the weather - rain and sunshine.

Have you used outdoor fabric? Does it weather well?

[Images via HGTV, Deck 1,  fabric, Deck 2, Deck 3]

Pin It Now!

Tuesday, October 2, 2012

Interior Design Course: Week 6

Here's a recap of what a learnt in week 6 (the final class) of the Interior Design Course

 
WEEK 6
Window Treatments and Decor
Types of Window Treatments
Decorating Your Home
Changing or Creating a Room Workshop

We were shown at length all the information there is to know about window treatments - the shapes and styles of coverings that suit your home depending on if you want light to come through, have kids and pets and need to clean them, etc.


Window treatments should not be an afterthought at the end of your home build when there is no money left. You should get a quote and work out a budget as some tracks and electrics can be installed during the build which will be cheaper than doing it afterwards.


We discussed the types of fabric you can use and the back lining and the pros and cons for each. The different pleats and eyelets ... I now know more about curtains that I ever thought possible!


Another important thing to think about is how the coverings will look from the outside of the house - you don't want the front of your house to have a mix of colours peeking through the windows it is best to keep them the same colour. If you do want different colours in each room you could have the same coloured blind on all windows and then a second blind with the colour. This is what we have done in our home - timber blinds throughout but in the rooms that needed more insulation and privacy block out blinds in different colours.

 
I'm pretty happy with the window treatments I've picked for our home -
  • Timber blinds throughout the house from Textile Traders when they have their buy 1 get 1 free sales. The curtain rods are also from Textile Traders.
  • The 2 side rooms my craft room/study and guest bedroom have cheaper aluminium blinds from Spotlight as the sunlight does not hit this side of the house.
  • The master bedroom and guest bedroom also have block out blinds in front of the blinds for extra privacy and to keep the sunlight out.
  • We have recently hung block out blinds in our living room in front of the timber blinds to make this room feel more cosy and secure.
  • All curtains are from Curtain Wonderland, again when they have their sales on (which they do now if you need curtains!)

My master bedroom - timber blinds and block out curtains


Study - Aluminium blinds


Guest Bedroom - Aluminium blinds and block out curtains
 
 
Living Room - Timber blinds and block out curtains


The latter half of the class was about decor with really interesting topics such as how to hang art and what colours to paint the walls behind art. I'm going through this at the moment with my stripe wall and it's true the colours you put behind the artworks can either contrast or compliment.


Displaying your collections together not spreading them out which makes them more special in a group rather than cluttering up each room with bits and pieces. Remember - strength in numbers!


There was homework but I am still in holiday mode so I haven't done it yet!

That was the last session of the 6 week Interior Design Course, you can read all about the other weeks here:
Week 1 you can read about here
Week 2 you can read here
Week 3 you can read here
Week 4 you can read here
Week 5 you can read here

[1st image and 6 images of master, study, guest, living room my own
All other images via Pinterest - Blinds Red here, Roller Blinds here, Eyelet Blind here, Curtain Blind here, Green Art here, Blue Art here, Clocks here, Globes here, ]
 
Pin It Now!

Monday, July 23, 2012

Accidentally Turning Into The Hulk House

We painted the front of the house this weekend to seal the render because it stains really easily even the rain was leaving marks on it. I know I haven't show you progress photos of the exterior yet - they're coming and here's a peek at the render on the front of the house but I just have to share with you a big colour stuff up on my part this weekend. All I can say is thank god for a patient partner Mr P and thank god for wine!

We finally found a gutter guy to install all the new gutters and down pipes, except that as the down pipes go against the walls we needed to paint first as it's impossible to get behind them once they're on. So the gutter guy half fitted them on Friday to allow us to paint over the weekend and he'll be back this week to finish it off.

First we had to sand back and paint the window frames - time was not on our side so we only managed to do the living room window done, the master bedroom window we'll have to do afterwards which is fine. To prep the walls I just used a soft broom and brushed it up and down the walls to get the sand and dirt off ready to paint.


Once prepped we headed to Bunnings to pick out the paint - we took a piece of the down pipe in Classic Cream and a piece of the render which is Limestone. I asked the paint chick to colour match the piece of limestone and she told me they have a colour called Limestone but they didn't have a sample card of the colour so all I had to go by was the picture on her computer screen. I made the bad decision of asking her to mix up a pot for me - a big 15 ltr pot of exterior paint which cost $190.


 It looked nothing like my piece of limestone rock eeeeeeek it's green!


Got back home and mixing it up thought it looked a bit green, but might be better on the walls. So started rolling it on and it was very green, not classic cream and definitely not the limestone I had asked it be matched  to. I was having flashbacks of a house Mr P and I almost bought which was green on the outside and we nicknamed it the Hulk House and decided against buying it as we didn't want to have to repaint it ... Now look at us turning our home into the Hulk House!


There is no denying from the photos it was green but to our eyes outside in the sunlight we were praying it would improve. Wasn't going to happen so we went back to Bunnings carrying the heavy paint pot and asked them to put some more colour into it - black - magenta - etc to try to hide the green. Got it home second time lucky and started to roll it on again and it was worse than the first time. The green was lighter and looking more limey with each stroke. There was no fixing this colour and as the sun was sinking we were fast running out of time to get it done.


We could've painted it on and hated it and lived with a Hulk House or we could swallow our pride and spend another $190 on a pot tinted in classic cream which is the same as the gutters and render. The safe choice. Why oh why did I try to complicate things? So that's what we did! You can't even see the difference in this paint colour it is that much of a perfect match to the render colour - I definitely worked hard to cover that green as fast as possible! We did 2 quick coats in the Classic Cream and finished the walls where the down pipes are going as it was getting dark the sun was setting. The rest of the house we'll try to get painted next weekend.


I made some amateur mistakes on this paint colour
  • Always buy a tester pot - we didn't have the time to test out colours but in turn we wasted 3 trips and $190 to get the paint colour we liked
  • Always check colour swatches - don't go off the computer screen - ever!
  • Don't go by the name of a paint - Limestone to me is the limestone blocks at the base of our house and the new limestone wall we had built - not lime pause stone which is what the colour turned out to be

You know the worst thing about this I felt like EVERYONE knew - people driving past, or walking past, or who lived on our street I felt like they were watching and knew what a stuff up we'd done because we were outside the house and couldn't hide it!

Have you ever had any paint colour disasters?
I'd love to hear about them so I don't feel like such a git!

[All images my own]

Pin It Now!

Tuesday, June 5, 2012

Hanging New Curtains In The Living Room

I've been thinking about putting curtains up in the Living Room over the timber slat blinds for a couple of weeks now.

There's a few reasons why but the main one for me is so it feels more private and secure, I don't want anybody peering through the slats and into the house. The other good reasons are it will make it more insulated and keep out that hot afternoon sun and keep out the chill at night.


So on the weekend we headed to Curtain Wonderland (where we've bought both curtains for the Master Bedroom and Guest Bedroom) just to see what they had in stock and when I saw the 50% off sale signs in the window I knew I might possibly find my curtains there and then!

I had in mind a grey colour and really liked the Willow eyelet blockout curtains which are textured grey fabric with a bit of a black and white fleck through them, even better they were reduced from $99.95 a panel to $59.95 and we needed 3 panels so the total came to $180 instead of $300 - not bad going.

If your buying curtains, always pay a bit more for blockout they really do make all the difference because they have a thick lining on the back and stop the sun, heat and cold.

Then we ducked into Textile Traders to get the matching metal curtain rod (the same as we have for the other rooms) and they had them reduced from $99.95 to $59.95 - it turned out to be a fast and efficient shopping trip for a change it always makes it easier when everything's on sale!


We wasted no time once we got home we pretty much put them straight up (well Mr P did while I was getting myself ready for a night out!).

The third time around it was a lot easier knowing what to do - laid out the curtain rod and joined it with a leftover rod insert we had from when we did the Master Bedroom (which had a small corner window which we used only half the rod for).

The rods are adjustable which make it easy to fit most windows.


Screwed in four brackets (3 come with each rod and we had 1 leftover from before) into the window frame as we figure its easier to patch and paint a frame than the whole wall if we ever want to remove them, and then used a string line and level to make sure it was straight before putting the rod up.


Then threaded the curtain panels on and the room looks totally different.

It feels really cosy and homely and I think the wall even looks bigger now its like one big window. Just excuse the wrinkles and grainy photos (I really need a new camera ... and an iron!)


I may have been playing it safe going with the grey curtains but I think the colour was a good choice because it blends with the walls and lets the accessories bring out the colour in the room.

I did eye off some green ones but thought it might be a bit matchy matchy with the green rug.

I definitely feel more secure and it has kept some of the outside noise out as well. Or maybe its a bit like hiding under a doona at night and feeling it will protect me from the boogie man. Either way, they're working for me!

What do you think of the new curtains?


 photo F0F68C01A59FABD46732FC15E1D8816D_zpsc6047f2f.png

For exclusive extras and daily updates ... follow Jarrah Jungle on Facebook, Instagram and Twitter


[All images my own]

Pin It Now!