Related Posts Plugin for WordPress, Blogger...

Monday, September 11, 2017

Book Club Book Review: The Alice Network By Kate Quinn

My Book Club's pick for the month of August was this new release novel The Alice Network by Kate Quinn


This novel has two exciting stories being told in parallel chapters, one from 1915 in World War 1 and the other in 1947 at the end of World War 11.

Based on the true tales of 'The Alice Network' of female spies in wartime, there are two main female characters who tell their stories - a young Eve who was recruited in France as a spy in World War 1 and then Charlie a young American girl who travels to London to search for her cousin who disappeared at the end of World War 11.

These two stories eventually connect and along the way you are taken on a wild journey of the horrors of war, self discovery, love and revenge.

I really admired the strong female characters and the way they did their part for the War. Learning the untold stories of how women made an impact in the War and held their own in a mostly male dominated time period made this story even more enjoyable to read.

I recommend this book to anyone interested in female spies during the War.

I give this book 5 stars out of  5

Jarrah Jungle's Star Rating:
1 Bad - I'd rather eat brussel sprouts topped with anchovies than read this again
2 Not Good - I'd rather watch paint dry than read this again
3 Ok - I'm sitting on the fence - its not great but not terrible either
4 Good - I'd give up a bottle of the worlds best champagne for this read
5 Great - I'd pass up a date with Ryan Gosling for this read

 photo F0F68C01A59FABD46732FC15E1D8816D_zpsc6047f2f.png

For exclusive extras and daily updates ... follow Jarrah Jungle on Facebook, Instagram and Twitter


[Image via Dymocks]

Pin It Now!

Tuesday, September 5, 2017

How I Organised Our Wedding Photos

I can't believe Mr P and I are just about to celebrate our 2nd wedding anniversary and can I just say married life is awesome I could not be happier being a wifey!

So today on the blog I thought I'd share what I've done with our wedding photos.


Our wedding photographer was a friend of ours who photographed the wedding as a gift to us which was amazing. He printed out some photos which I've stuck into our wedding album that I had custom made for us and the rest are on a USB stick for me to print out.

I've turned our wedding album into our book of love - Mr P cringes everytime I ask friends and family if they want to look at our book of love .... I think it's funny and I feel like Isla Fisher from Wedding Crashes you know the scene when she pulls out the wedding album when she just starts to date Vince Vaughan and everyone cringes! Yep that's what I do!!

The album holds the engagement photos, engagement invitations and messages in a bottle. Plus from the wedding it has the invitations and stationary, a copy of poems read and our vows, polaroids from the photo booth and printed photos from the wedding.

I just love having this one book with all our memories captured from our engagement and wedding.


As for framing photos this is the only enlarged photo I have printed from the wedding which I have put into a copper frame.

I really must pick out some more favourite photos and frame them!


With the digital photos on the USB I created a wedding album for my parents which I made online with Snapfish which they print and post out. I added mostly photos of our family and us getting ready together the morning of the wedding and special shots which I thought my parents would like.

I have started to do another Snapfish album for Mr P and I with most of the wedding photos but it's just finding the time to play around with the album online.


For gifts for my Matron Of Honor and Bridesmaid I used Snapfish again to print a copy of a photo onto a wooden block and added some text. They come with a little stand holder but they also sit on their own as they're a block shape.

I like this as an alternative to printing a photo and finding a frame for it and they work out pretty reasonably priced at $20 each delivered.


I also did one of these as gifts for my Nanna and Mr P's parents (or should I say my Parents-In-Law!)

I am going to order some more of these photo blocks for Mr P and I and they also make great gifts.


I printed out a special photo onto a canvas and added the 'our wedding day' text.

Snapfish always have deals on their website and I got this canvas for 70% off!


I had some heart shaped ornaments printed on Snapfish as well which I thought would make nice Christmas gifts. The first lot I ordered the text was cut off and so I asked them to reprint them which they did (at no cost) and they came out perfect the next time.


It's taken well over a year but I've finally managed to organise all our wedding photos.

Now be honest .... How long did it take you to print or frame your wedding photos?!

Sharing with link party:
Curly Crafty Mom - The Creative Corner


 photo F0F68C01A59FABD46732FC15E1D8816D_zpsc6047f2f.png

For exclusive extras and daily updates ... follow Jarrah Jungle on Facebook, Instagram and Twitter


[All images my own]


Pin It Now!

Monday, August 14, 2017

Book Club Book Review: The Dry By Jane Harper

My Book Club's pick for the month of May was The Dry by Jane Harper.

It took me a little longer to read with our little Miss A's arrival thus why this book review is a few months late! Hopefully I'll find the time to get back into my reading list soon as I have a few new release books I'm dying to read and review.


This is an Australian outback murder mystery set in a rural drought affected town called Kiewarra in Victoria.

The main character Aaron, now a Federal Police Investigator, was accused of a murder 20 years ago and reluctantly returns to his home town to attend funerals of his former best friend Luke and his family.

The story quickly unfolds as Aaron tries to solve two murders - one from the past and one from the present.

This is a really fast paced mystery, with realistic characters which really made the story believable, and an interesting storyline from both the past and the present.

It took me a couple of months to finish this book as I was only able to read a chapter here and there but it was an easy story to pick up from each time and was a really easy book to read.

I recommend this book to Australian crime readers.

I give this book 5 stars out of  5

Jarrah Jungle's Star Rating:
1 Bad - I'd rather eat brussel sprouts topped with anchovies than read this again
2 Not Good - I'd rather watch paint dry than read this again
3 Ok - I'm sitting on the fence - its not great but not terrible either
4 Good - I'd give up a bottle of the worlds best champagne for this read
5 Great - I'd pass up a date with Ryan Gosling for this read


 photo F0F68C01A59FABD46732FC15E1D8816D_zpsc6047f2f.png

For exclusive extras and daily updates ... follow Jarrah Jungle on Facebook, Instagram and Twitter


[Image via Dymocks]

Pin It Now!

Monday, August 7, 2017

Introducing Our Little Baby Girl ... Miss A

Apologies for my absence on the blog these last few months this has been the longest break I've had in the 7 years I've been blogging!

I have a pretty good excuse .... Mr P and I welcomed our little baby girl Amelia (who will be known as Miss A on the blog) into the world on 16 May 2017 at 1.21pm she weighed 3.040kg and was 48cm long.


I had plenty of time before Miss A was born to nest at home, re-arrange all the cupboards and do a big spring clean, get the nursery ready, and was on Dr's orders to rest and take care of my health. By the end I was a bit over being pregnant and some of the health issues that came with it and was ready for our little Miss A to arrive and that she did a bit earlier than expected, when I was 38 weeks pregnant, the day after my Birthday so we'll now be sharing a Birthday weekend!

The birth was nothing like I thought it would be and was the opposite of my birth plan although I'll spare you all the details other than to say I went into labor at home and thankfully Mr P made it home from work and got me to the hospital because 40 minutes later Miss A was born. 

I'm so very thankful Miss A is a healthy baby and while I had some health issues during the pregnancy and after the birth I'm happy to say I'm feeling back to my normal self now, well besides the sleep deprivation that is!


These last few months have been a blur of sleepless nights and newborn cuddles and getting to know our Miss A and working out this whole parenthood gig.

I still can't believe that I'm a Mum .... but the endless loads of baby clothes I am washing, the nappies I have changed and the constant feeding certainly proves that I am! Speaking of clothes my Mum unpacked an old trunk full of baby clothes that were mine when I was a baby, a lot was handmade and knitted or crochet by my Nanna (Miss A's great-grandmother) and it's so special to dress Miss A in my old baby clothes (like the yellow and blue cardis, white bonnet, booties and shoes above) I just need to dress her in a mix of vintage and modern clothes so she doesn't look too old fashioned!

I'm on maternity leave for a year and after 20 years of working I'm really enjoying being at home. Mr P had a few weeks off work in the beginning and is a very hands on Dad and was the one who had to show me how to change a nappy!

I'm lucky to have support from friends and family who drop in when I need a hand and give Miss A some cuddles so I can have a shower or get dinner ready - my slow cooker has been a lifesaver I can make dinner while Miss A naps (babies sleep A LOT!) and dinner cooks during the day and keeps warm until Mr P gets home from work and we can eat together.

Our rescue dog Lexi has been really good with Miss A and taking on the protective big sister role well. I just know these two are going to grow up being the best of friends!


We are loving spending time at home as a little family and while the days blend into weeks and months already I am enjoying this slower pace to life right now.

While I'm in this newborn bubble I won't be blogging as regularly as I was before but you can keep in touch with Jarrah Jungle daily on my social media pages - Facebook, Instagram and Twitter.

Welcome to the blog Miss A!


 photo F0F68C01A59FABD46732FC15E1D8816D_zpsc6047f2f.png

For exclusive extras and daily updates ... follow Jarrah Jungle on Facebook, Instagram and Twitter 


[All images my own]

Pin It Now!

Friday, May 5, 2017

Nursery Tour: Pretty In Pink + Glimmers Of Gold

Our little jelly bean is due this month and I've finally finished furnishing and decorating the nursery for her so I thought I'd take you on a nursery tour.

This use to be my craft/study room before we turned it into the baby's nursery and the design plan was to work with what we had and stick to a budget which I'm happy to say we've done. You really don't need to spend a lot of money when decorating, I shopped around home a lot using decor and furniture I already had, we purchased furniture secondhand, plus inexpensive stores like Kmart and Target are great for affordable decor and everything baby!

I've added links to similar products throughout this blog post to Temple and Webster Australia's largest online furniture and homewares retailer as they have a great selection of baby and kids products and furniture. I have my eye on a toy box and of course every little girl needs a doll house or a teepee ... there's so many adorable things to pick from!

I wanted to keep the design neutral and calming making it a perfect place for baby to sleep so nothing too bright or out there. The colour palette started as white, grey and black and evolved with added pops of pink and gold to make it feminine and pretty.


We bought and hung new blockout blinds over the silver blinds as it's such a bright and sunny room and we need to make it dark for daytime naps!

Some of the furniture we already had (the bookcase, wardrobe and side table), plus the rug and light fitting black chandelier we kept as it suited the colour theme. 

We purchased some furniture items secondhand from Gumtree like the Ikea wing chair - I did lots of research on a perfect nursing chair and Ikea's wing chair was a winner and it's really comfortable. Although I still need to find a foot stool to go with it.


The bookcase had to stay in this room and still holds all my books but I've kept the top two shelves for the baby's books and decor.

I shopped from home and used my own decor items for the  bookcase - anything white ceramic or animal seemed to fit well as nursery decor. I bought a salt lamp to use as a night light as it gives out a nice soft glow and also has lots of other healing and purifying qualities.

If you're looking for some adorable kids bookcases check out Temple and Webster they have a great range to pick from here.


The Ikea Hemnes drawers were also a bargain secondhand find on Gumtree as they are actually brand new and were still in the original packaging. I decided the drawers will double as a change table with a change mat on top and all the change supplies in the top drawers and then clothes in the drawers underneath. 

I just love how much storage this piece of furniture provides and for a small room it's great having furniture that is multi-purpose. I'm also using the top as a dressing table with jars for headbands, dummies and vintage jewellery boxes.


Baby's clothes are so itty bitty tiny so a few sets of the Ikea drawer dividers are perfect for keeping all the clothes neat and tidy. But let's just see how long they stay this way for!

I also typed up some labels for each divider so you can see at a glance the size and what the item is.


Over in the wardrobe there's heaps of storage space as well for all the hanging items like dresses, jackets and sleeping bags. 

I made little size dividers from some butterfly blackboard pegs I had in my craft supplies and tied them to string which hangs down to separate the clothes.

I was lucky enough to get a big bag full of matching baby hangers in different sizes for free from Pumpkin Patch as they were closing down.

I've used a hanging wardrobe organiser that I already had for storing all the baby's linen, blankets and swaddles. 


The vintage bassinet was lent to me by a friend and our little one will sleep in this in the bedroom with Mr P and I until we decide to move her into her nursery and into her cot. 

The purple netting was from when I was a baby and covered my own bassinet. I just love that it's been kept all this time and can be passed down through the generations. My Mum has also unpacked all my old knitted and crochet baby clothes which are just beautiful I can't wait to dress my little girl in the same clothes that I wore over 30 years ago! 


The cot is another special item as it's been passed down in Mr P's family. It's the only timber item in the room so we were going to paint it white but like the contrast the timber wood adds so we've kept it as it is.

Above the cot hangs a bird cage I've filled with paper flowers and bird decor and on the wall are some bird mirror wall decals. Both of these were already there from my craft room/study design and I think fit in nicely with the nursery so have kept them there.


The art in the room I'm sure I'll change around over time but for now I have - 

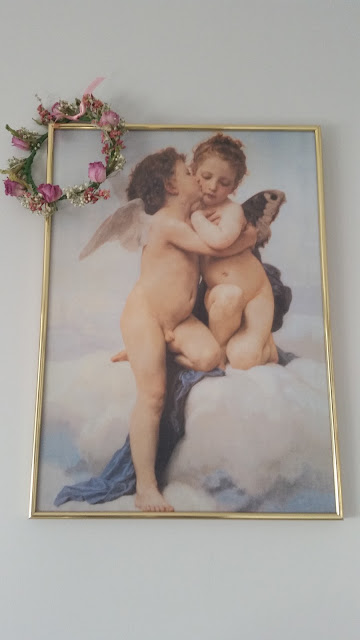
"The First Kiss" angel print is a special one I brought back from Rome on my first overseas holiday 20 years ago. The gorgeous girl with goose art was a baby shower gift from beautiful friends. An Ikea butterfly wall art I've added some flower vines too. Lastly I DIYed the wooden art from a print I found on Pinterest, printed out and framed.


I really love how the nursery has turned out, the room has such a nice feel to it and hopefully I've got everything ready for when our little bundle arrives this month.


What do you think of our little baby girl's nursery? 

 photo F0F68C01A59FABD46732FC15E1D8816D_zpsc6047f2f.png

For exclusive extras and daily updates ... follow Jarrah Jungle on Facebook, Instagram and Twitter


[All images my own]

Pin It Now!

Wednesday, May 3, 2017

DIY: How To Make A Wheelie Bin Screen

Our local council supplies us with 3 big wheelie bins for general rubbish, recycling and garden waste and we keep them at the front of the house in the driveway.

The bins don't make the best first impression to our visitors who walk past them on their way to our front door plus they take up space in the driveway where we want to park our cars.

So when we designed our front courtyard we included in the design putting the bins in the corner of the courtyard so they are out of the way. Having 3 bins all lined up was still pretty unsightly so we decided to make this wheelie bin screen in front of them to hide them from sight.

The finished timber look wheelie bin screen 


Initially I wanted a screen made from decorative privacy screens but because of the patterns you would still be able to see the bins through them and the screens and a frame would cost over $400.

So then we had the bright idea of making a screen from the Alitimber metal fence slats which we used on the courtyard fence. This would mean the screen will blend in with the fence behind as it's made from the same product, plus we could make little to no gap between the slats so the bins were hidden properly and we had a few lengths leftover so the cost would be less.

The pack of metal fence slats, support posts, inside channels, caps and cement cost us about $300. The other items needed for this DIY is a circular saw, tape measure, level, drill and screws.

DIY: How to make a wheelie bin screen

First things first we worked out how long we wanted the screen to be to fit the 3 bins. Then Mr P cemented a support post into the ground on one side and attached the other support post to the exterior brick wall of the house.

Next we fitted an inside channel to the middle of the support poles with a few screws and used a level to make sure it was straight. The inside channel is what you screw the metal fence slats to. 


Once the two support posts were in place we waited until after the courtyard had been paved before making the screen otherwise it would be in the way of the guys laying the limestone pavers.

This may have taken us almost a year to get around to finishing but as the saying goes Rome was not built in a day! Renovating takes time as well but we get there in the end!!


So over the weekend Mr P got out the circular saw, measured the distance between the support poles and cut the metal fence slats to size.

Using the level again to make sure it was straight Mr P attached the fence slat with screws into the channel in the support pole. Working from the top to the bottom once the first slat is in and straight then the rest are easy to install. We didn't want a big space between the slats or you'd be able to see through the screen so we used a 2mm spacer so there was only a very small gap.

A cap is placed on the top of each support pole to stop any water getting in and then it was done.


Now all 3 wheelie bins sit behind the screen out of sight. The screen also hides the reticulation controls and power supply.

We now have our entire driveway to make use of for parking the cars and it just looks so much nicer at the front of the house without the big green wheelie bins in the way!

This was a great DIY weekend project to tick off the to do list and in fact is the last project to tackle in our front courtyard garden - it is now officially done and we can sit outside in our outdoor oasis and enjoy what we've created.

Where do you store your outdoor rubbish bins?


 photo F0F68C01A59FABD46732FC15E1D8816D_zpsc6047f2f.png

For exclusive extras and daily updates ... follow Jarrah Jungle on Facebook, Instagram and Twitter


[All images my own]

Pin It Now!