Related Posts Plugin for WordPress, Blogger...
Showing posts with label Winter. Show all posts

Wednesday, August 24, 2016

My Water Wise Plants + Pebbles Courtyard Garden

I have been dreaming about our courtyard garden for many, many years now and it's almost surreal that my gardening dreams are now becoming a reality!

Let's take a trip down memory lane to the front of our house 
BEFORE the courtyard renovation .... 


Now let's look at its progress today!


The Courtyard isn't completely finished yet but we don't have much left to do ..... We need to install our new shade sail to the poles, build a screen to hide the rubbish bins, seal the limestone pavers and then add furniture and pot plants and it will be an outdoor living space that we will want to spend time in all year round!

Over the last few weekends we've been planting a garden straight from my Pinterest inspiration boards with hardy plants that are perfect for the front of the house which gets a lot of sun and will need to survive a hot Aussie summer.

As the Rain Chain feature is part of this garden bed and it's close to the house foundations we also wanted plants that don't need to be watered very often so water wise plants were on the wish list.


The yukkas we grew from cuttings given to us from a friend and when we removed them from their pots we noticed some were growing extra plants and so we split them into more plants.

I'm so amazed that these yukkas cost us nothing as they are such a good looking plant and make a real statement in the garden too!


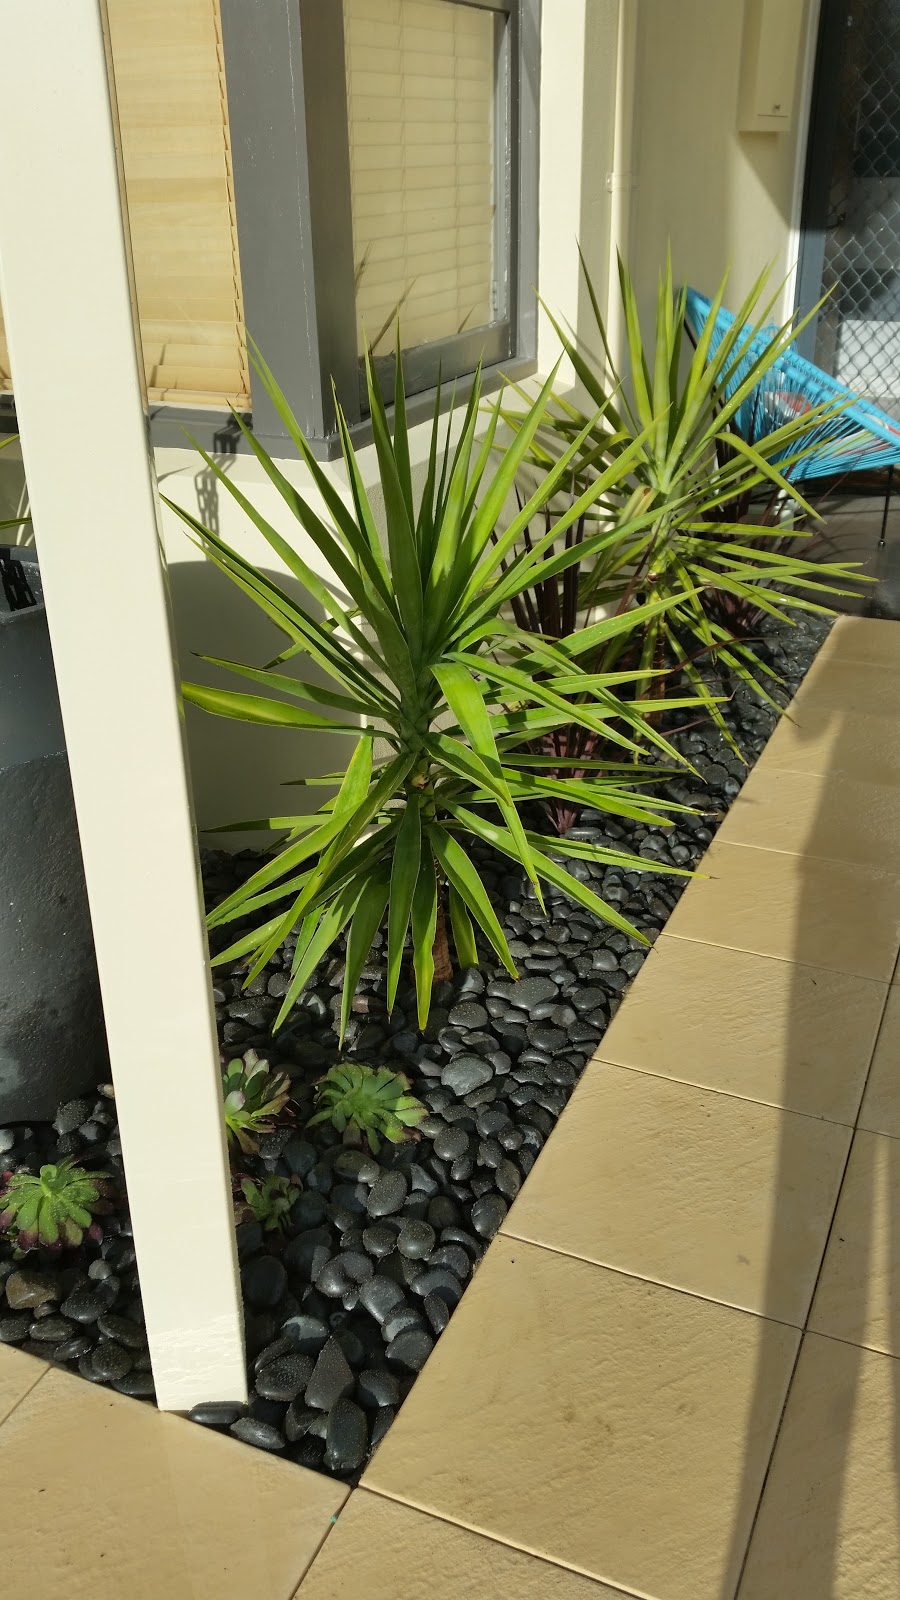
Next we planted some Cordyline black knight plants which are a red/purple plant and compliment the timber look fence perfectly. 

I love the spiky plants and the way they look architectural and modern. 


We add a few succulent plants to fill the gaps and we're hoping they'll grow and spread a little more to cover the ground.

I love succulents they are my favourite plants and this is a nice sunny spot for them to thrive in.


Instead of mulch we decided to add pebbles as a top layer to create contrast around the plants and in the garden bed. We shopped around for pebbles and found Masters had the best value - 20kg bags for $10 and we used 22 bags in total.

As the Rain Chain feature pot is in this garden bed we also wanted a solid base for any rain that may overflow down the Rain Chain in heavy downpours. Pebbles would keep the area a lot cleaner than mulch or soil would which will wash away and make a mess if it gets too wet.

I love how the black pebbles look against the limestone pavers and it makes the plants really pop as well. We just hope the pebbles won't heat up too much in the sun and that the plants will be tough enough to handle it if they do! 


We had to finish the reticulation in this part of the garden so that it's on its own watering program (we have separate zones for the lawn, the front verge area, the herb/veggie garden and this pebble garden because they all have different watering needs and need to be watered at different times).

Mr P fitted sprinklers around each plant so they will be watered automatically because my black thumb cannot be held accountable for keeping the plants alive!


Around the front of the garden to balance out the Rain Chain feature pot we added a similar feature pot that is slightly smaller with a large yukka planted in it.

Then we planted some yukkas and cordylines in between.


The courtyard garden is really coming along nicely.

I love how this garden design was easy to plant out and with the hardy plants it should be easy to take care of (or better yet it takes care of itself!).


The next gardening project for the courtyard is to plant a vegetable and herb garden and I have already sown some seeds which I've watched sprout and I can't wait to grow my own fresh veggies and herbs!

What are you growing in the garden?


 photo F0F68C01A59FABD46732FC15E1D8816D_zpsc6047f2f.png

For exclusive extras and daily updates ... follow Jarrah Jungle on Facebook, Instagram and Twitter


[All images my own]

Pin It Now!

Tuesday, July 26, 2016

Recipe: Chicken + Vegetable Laksa

I made this Chicken and Vegetable Laksa for dinner the other night and it was a winner - it was quick and easy and delicious so it's been added to my menu plan rotation as a tasty mid week dinner. 

With the added vegetables it's a hearty and filling meal in one and you can always add more spice and chilli if you want to warm up your belly on a cold night in!


Chicken + Vegetable Laksa
Serves 4

Ingredients
Peanut oil
Half a bbq chicken, shredded
2-3 tbs of laksa paste (or more if you like it hot!)
Red onion, sliced
2 cups of chicken stock
1 can of coconut milk
1 tbs palm sugar, grated
1 tbs fish sauce
2 tbs lime juice
200g dried vermicelli rice noodles 
Cup of mixed vegetables (I used green beans and chopped cauliflower, broccoli and carrot)
2 cups of bean sprouts
1/2 cup fresh coriander leaves
3 spring onions, finely sliced

1. Heat oil in large saucepan. Add laksa paste and cook stirring for a few minutes until fragrant. Add onion and cook for a few minutes. Stir in stock and bring to the boil.

2. Cook noodles in boiling water, drain, rinse and keep warm.

3. Add to the stock mixture the coconut milk, chicken and vegetables. Stir in sugar, fish sauce and lime juice. Reduce heat to low and stir occasionally until mixture is heated through (do not let boil) and the vegetables are cooked.

4. When ready to serve divide the cooked noodles amongst soup bowls, ladle the soup over the noodles, top with a generous amount of bean sprouts, spring onions and fresh coriander.


I can't get enough of soup during winter and it's nice to find a spicy variation to traditional soup recipes.

What's your favourite belly warming soup?


 photo F0F68C01A59FABD46732FC15E1D8816D_zpsc6047f2f.png

For exclusive extras and daily updates ... follow Jarrah Jungle on Facebook, Instagram and Twitter


[Images my own]

Pin It Now!

Wednesday, July 20, 2016

DIY: Painting The Eaves Around The House

I am happy to report that Mr P and I did our last lot of exterior painting of the Jarrah Jungle home the other weekend and finished painting the eaves around the front of the house.

We have painted every part of our exterior from the rendered brick front and back and sides of the house and the window frames (we painted these twice ... the first time white and then a few years later a charcoal colour).

The old fibro asbestos eaves we had removed and replaced with fibre cement sheets when we did our garage extension about 4 years ago. We painted the back and side eaves when we painted the back of the house but we hadn't gotten around to painting the front eaves ... until now!


To finish off the eaves Mr P had some scotia that he cut to size on an angle using the power saw and then secured to the eaves with a nail gun. The scotia fills the gap between the brickwork and ceiling and makes it look neat and tidy.

Any nails that were sticking out Mr P hammered in so they are smooth and then used a putty to go over the nails so you couldn't see the nail heads.

The eaves and scotia were then ready for painting.


To prep the eaves to paint we used a broom to clean off the cobwebs, bugs and dirt and then used a dry rag to give them a good wipe over to make sure they were clean.

We laid drop sheets down and only used painters tape for the garage door area and the rest of the eaves Mr P painted free hand with a patient hand, an angled brush and a wet rag to wipe up any drips and slips as he went.

Now for the type of paint we used Spring Flat Plastic Paint in white - it is a really inexpensive paint (we picked up 4 ltrs from Bunnings for under $15). The odour is a little strong but as we were painting outside it didn't really bother us. It is a plastic type paint so it will take forever to mix properly by hand so I suggest you use a paint mixer like the one I'm using below - simply attach  the mixer to a drill and use the drill to mix it and it's ready in just a few minutes. 


That's it once the prep work was done we were ready to paint .... Mr P as always was the cutting in master and I'm the roller girl waiting for my turn to follow with a roller. I am very grateful to whomever invented the painting stick or I'd never be able to reach the ceiling!

We painted on one coat and then waited a few weekends (due to the wet weather) until we could get out there and do the second coat of paint.


What a difference a nice fresh coat of white paint makes. 

But wait that's just the first coat you always need to do two coats to get a nice even coverage. But the good news is the second coat always goes on much quicker and easier.


It's almost a bittersweet feeling knowing that we have almost finished our Jarrah Jungle renovations ... how will we spend our weekends when we don't have things to paint!

Have you done any painting around the house lately?

I have added our painting projects big and small to my Projects Page which you can find here


 photo F0F68C01A59FABD46732FC15E1D8816D_zpsc6047f2f.png

For exclusive extras and daily updates ... follow Jarrah Jungle on Facebook, Instagram and Twitter


[All images my own]

Pin It Now!