Related Posts Plugin for WordPress, Blogger...

Friday, February 10, 2017

Nursery Design - Working With What We Have

With Mr P and I expecting a new addition in the Jarrah Jungle home I've been busy planning our baby's room in my head for months and months and now we're ready to actually start setting up the nursery for our sweet little girl due in May.

I don't want to spend a fortune on the nursery and have given myself a $700 budget for all the furniture and decor. I'll mostly be using furniture we already have and need to get just a few other things and then make them all work together so everything looks like it was meant to be together and not the mix matched collection of furniture that it is!


Working With What We Have 

I have an Ikea cube bookcase in dark wood which needs to stay in the nursery (which use to be my study/craft room) as there's nowhere else to put it in the house and I also need to keep my books on the shelves.

But I'll clear some shelves and make it more baby friendly by adding cute ornaments and baby books. Just recently I had a big clear out and donated a heap of books to charity but I'll be doing another purge to make room for some baby books as I'd love for our little one to be as addicted to books as I am.

Excuse this old photo but it's the only neat and tidy one I have as I've accumulated so many books in the last 5 years since purchasing this bookcase it's overflowing!


When I found out we're having a girl I knew a wardrobe was a must to hang all her pretty dresses and coats - already our little one has a better wardrobe of outfits than me!

I have an Ikea wardrobe which was in the Guest Bedroom and was storing our winter coats and travelling gear which I have managed to squash into our Master Bedroom wardrobe so I can move this wardrobe into the nursery.

I plan to add a few shelves in the wardrobe to store baskets and boxes so I can organise all the baby's things like linen and nappies and anything else baby related I can fit in here!


We have been given a beautiful timber cot which has been in Mr P's family for many years and I love the sentimental thought that it's been passed down through the family.

Unfortunately the timber doesn't match the other white and dark wood furniture so Mr P is going to paint the cot white so it matches in with the other furniture in the room.


Our only purchase so far is the Ikea Hemnes chest of drawers which I've had my heart set on for ages and managed to buy on Gumtree brand new and still in it's original packaging for a bargain $320 (its RRP is $449).

I did my research and read a lot of reviews before settling on these drawers which will double as drawers for the baby's clothes and also as a change table by placing a change mat on top. I don't have space for a separate change table and don't want to spend money on something I may only use for a short time so felt the drawers were a better long term investment.

These drawers are the perfect height for Mr P and I and I can put the change mat on one side so I can stand on the end of the drawers to change the baby (as changing side on may be difficult), and it's long enough to have the changing supplies and nappies on top at hands reach.


My other purchase will be a nursing chair but I'm still undecided whether to get a proper nursing chair like a glider (a chair and footstool that moves back and forth), or a rocking chair, or if a really comfortable big armchair with a high back would be better as it could be moved to another room when it's not needed in the nursery anymore.

What type of chair would you have in a nursery?


I'm trying to be practical in my choices and get pieces that can be used later for other purposes rather than for just a short time in the nursery.

I'm also shopping from home for items we already have that will look good in this room like the rug, light fitting, art and wall decor.

I'm slowing chipping away doing a little project here and there and hope to have the room ready in the next few weeks so I can really start 'nesting' as they call it!

What are your must haves for a Nursery?


 photo F0F68C01A59FABD46732FC15E1D8816D_zpsc6047f2f.png

For exclusive extras and daily updates ... follow Jarrah Jungle on Facebook, Instagram and Twitter


[First 3 images my own - Last 2 images via my Pinterest 1, 2 & 3]

Pin It Now!

Wednesday, February 8, 2017

Backyard Progress: Patio Build + Fence Install

Following on from last weeks backyard progress blog post and our new timber deck being built as part of this design we also had the carpenter build a patio to sit over the deck.

The patio comes directly off our house and will be like an outdoor room where we can BBQ, dine, chill out and entertain.

Firstly, the treated pine patio posts were core drilled into our new limestone retaining wall for strength and support. Once the patio was finished the carpenter installed a Colorbond fence (the same as the new side fence) along the retaining wall and these patio posts will form the support posts for the fence. 


The frame is all made from treated pine which we will stain to look like a more expensive timber.

We went with a peaked roof design rather than a flat roof so it has a higher ceiling and gives the illusion of more space. 


Mr P and I got busy on a stinking hot 40 degree weekend and stained all the patio posts and ceiling beams and transformed the treated pine into a beautiful looking timber.

This had to be done before the carpenter could install the roof sheeting.

I'll be writing a separate blog post on How to stain a treated pine patio in 7 easy steps using Cabot's exterior products. Here are a few sneak peeks of us staining the patio and when I say "us" of course I mean Mr P did all the work while I kept him replenished with icy cold drinks, snacks and words of encouragement!


We spent the weekend applying the stain and then the carpenter returned during the week to install the metal roof sheeting.

For roof colours we picked Colorbond - Shale Grey which is a light grey as we thought the lighter colour would be a bit cooler and the grey tones suit our tile roof colour which is Colorbond - Monument and is a very dark charcoal.

We also added some sheer roof sheeting to let light in as we were worried the closed in roof would make the inside of our house too dark - we picked the sheer roof sheeting in a 60% tint.

The house is a bit darker now that the patio roof is on, even with the tinted sheets, so it was a good idea to include these otherwise it would be so dark we would need to turn lights on during the day which is not what we want to do.


For some colour contrast we painted the treated pine ceiling beams white so that the stained timber frame would stand out more. If it was all stained timber we thought it would be a bit too busy.

Funny story about painting the treated pine ceiling beams white .... I accidentally painted the wrong ones - there were 2 piles of wood and I painted the flat beams instead of the square beams - this is why I'm good at making sandwiches while Mr P tackles the DIY!

The carpenter had to paint the correct pine beams white before he installed them. 


The carpenter then installed the Colorbond fence panels using the treated pine posts (which we had stained) as the supports the fence was attached too.

This was Mr P's idea to break up the metal fence with timber and to make the posts a feature - I was really unsure about it and wanted to play it safe and stick with metal fence supports the same colour as the fence but in the end Mr P was right they really do make a nice feature.

Sometimes you need to take risks when renovating and trust that it will turn out for the best!


With the patio being attached to the house there were some changes that had to happen to our gutters and down pipes as well - the roof tiles were removed and the house gutter and a different style a V gutter attached between the house and patio.

A new gutter was installed on the outside of the patio and we picked the same colour as the roof sheets Colorbond Shale Grey.

New down pipes were installed as well which we picked in both Colorbond Classic Cream to match our cream coloured rendered brick walls and in Colorbond Manor Red to blend in with the timber support poles stained in 'jarrah'.

What a big project this has been - first we had the retaining walls built, then the deck was laid, then the patio with a new roof was built and lastly the fence was installed.

The French Doors we installed 4 years ago in the kitchen and dining room by removing a window and turning it into a doorway are finally being opened and used to access the deck and patio area which is awesome.


I can't believe after all this time our long awaited dream for a backyard deck and patio has finally become a reality!

All that's left to do now is oil and seal the timber deck which is our next weekend project and as mentioned I"ll be using some exterior products from Cabot's to do this.

Then we can move our outdoor furniture and bbq out here, decorate with some pot plants, and finally relax and enjoy the outdoor room we have created!

Do you have an outdoor patio or pergola?

 photo F0F68C01A59FABD46732FC15E1D8816D_zpsc6047f2f.png

For exclusive extras and daily updates ... follow Jarrah Jungle on Facebook, Instagram and Twitter


[All images my own]

Pin It Now!

Monday, February 6, 2017

Book Review: After You By Jojo Moyes

This is a book review of After You by Jojo Moyes which is the sequel to Me Before You.

I absolutely love Jojo Moyes and this is the third book I've read of hers - check out my reviews of The Girl You Left Behind and Me Before You.


This is the story of Louisa and how she is recovering from the death of her boyfriend Will who was wheelchair bound, very ill and took his own life in the first book Me Before You.

The story deals with grief and loss and coming to terms with life after a loved one dies. It is quite a sad and depressing read but also a very real one as well.

The writing is modern and easy to follow and often funny. Overall I felt the story was a little ho hum and repetitive but Louisa's family antics, cringe worthy work situation and sexy love interest made the story a bit more interesting.

I recommend this book to fans of Me Before You if you want to see what becomes of Louisa after Will's death.

I give this book 3 stars out of  5

Jarrah Jungle's Star Rating:
1 Bad - I'd rather eat brussel sprouts topped with anchovies than read this again
2 Not Good - I'd rather watch paint dry than read this again
3 Ok - I'm sitting on the fence - its not great but not terrible either
4 Good - I'd give up a bottle of the worlds best champagne for this read
5 Great - I'd pass up a date with Johnny Depp for this read

 photo F0F68C01A59FABD46732FC15E1D8816D_zpsc6047f2f.png

For exclusive extras and daily updates ... follow Jarrah Jungle on Facebook, Instagram and Twitter


[Image via Dymocks]

Pin It Now!

Friday, February 3, 2017

Creating A Family Friendly Home

With our new addition due in May (just over 3 months away!) Mr P and I have been busy turning our Jarrah Jungle into a family friendly home.

We are trying to finish all our renovating projects big and small in the next few months before our little one arrives - from plastering and painting ceilings, to installing door handles, wallpapering, planting a vegetable and herb garden in our front courtyard, setting up our new deck and patio space, making the backyard dog friendly with some grass and paving for Lexi ..... there's so much we want to do!


Besides all the renovating projects we also need to make changes to create a more family friendly home for the baby's bedroom, living space and bathroom and this is what we've come up with.

1. Goodbye Study/Craft Room .... Hello Nursery

We have 4 bedrooms - our master bedroom, guest bedroom, Mr P has his man cave and I have my study/craft room.

So what room will be turned into the nursery? After much consideration, unfortunately for me, we decided the best option is to turn my study/craft room into a nursery so Mr P gets to keep his man cave for now!

I've been busy finding a new place for all the bits and pieces I store in this room. I loved having my own creative space but I'll admit it was used more for storage and I would actually do my creative projects in the living room.

I can't wait to set up the nursery and plan to decorate it on a modest budget and use furniture and decor we already have. 


2. Creating extra living space .... An outdoor room

Another issue we have at home is we only have one small living room. Perfect for a couple but it's a bit of a problem now that it's going to be a combined space for entertaining adults mixed with an area for the baby's toys and equipment and things.

I like my home to be neat and tidy and everything in its place and know that sitting on the couch trying to look over all the baby's things will drive me crazy!


We are hoping our new backyard deck and patio we have just finished building will give us essentially another living room that can be an outdoor room and entertaining space for adults. 

We'll put some comfortable outdoor furniture and a TV out here so Mr P won't miss out on his sport if the cartoons are on and if the baby's equipment is spread everywhere inside we can retreat to our adults only outdoor room!


3. Bath time without a bath

The other issue we have is when we renovated our bathroom we indulgently removed the old bath and included a big double shower which I absolutely love but it means we don't have a bath for the baby!

I plan to get a baby bath to sit in the shower but from what I know most people bath their baby and young kids in the bath not the shower - I hope it won't be too difficult trying to use a baby bath in the shower.


We did think ahead when we did our laundry renovation and installed a large laundry trough and a laundry bench in here.

So for bath time I'm hoping we can utilise the laundry as well as a baby bath in the shower.


I'm pretty sure for the first year at least we will manage just fine in our home as it is with these changes.

Although we are keeping an eye on the housing market for a bigger family home to move into for the future, but for now we don't want to leave our beloved Jarrah Jungle home!

I think we're on the right track for creating a family friendly home.

Did you need to make any family friendly changes to your home?

 photo F0F68C01A59FABD46732FC15E1D8816D_zpsc6047f2f.png

For exclusive extras and daily updates ... follow Jarrah Jungle on Facebook, Instagram and Twitter


[All images my own]


Pin It Now!

Wednesday, February 1, 2017

Backyard Progress: Our New Timber Deck

Our backyard renovations are really coming along nicely with our patio and deck project underway.

As soon as the stonemason had finished building the limestone retaining walls the carpenter could start building the deck and patio.

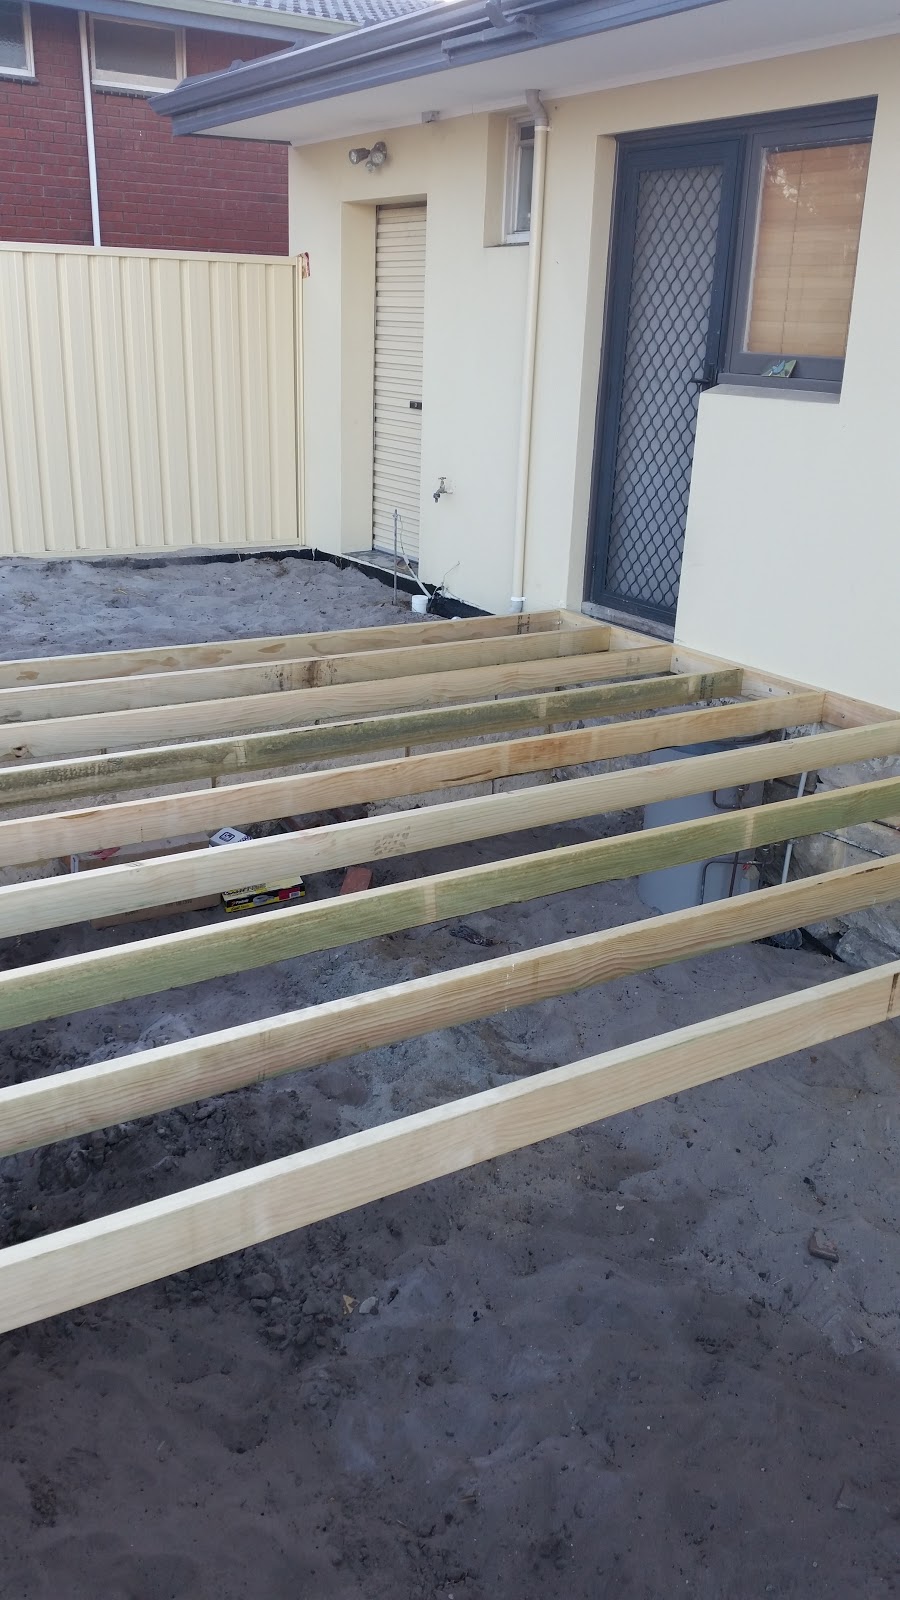
Firstly, the carpenter built a treated pine wood frame all around the inside of the retaining wall structure and then support beams were attached to the frame.


Then he added both pine stumps and metal supports which were concreted in underneath the deck to add further support to the deck above.


Once all the frame work was in the timber deck was laid on top of the frame - we went for a natural timber in Merbau hardwood which is a dark brown wood similar to Jarrah and will compliment our Jarrah floorboards well.

There are two sizes to pick from - thin or wide boards and as it's a big space we went for the wide board in 140mm - a smaller space would look better with a thin board.

We thought about using a composite plastic deck material but it would be more expensive and because our deck is undercover of the patio and protected it won't be exposed to the elements so the natural timber will keep in great condition. If the deck was not covered and exposed to the elements we would've paid the extra money and gone with a composite plastic deck material.

The natural timber will still need to be oiled and sealed to protect it and I'll be doing a DIY How to oil a deck blog post using some awesome outdoor products from Cabots.


You can see how the deck is all on the same level as the dining room french doors and the laundry door so when we step out of the house the deck will be like an outdoor room and extension of the house.

The sandy patch below that steps down to our garage door (which is at a lower level) we are going to lay pavers and lawn here so the backyard is dog friendly for our rescue dog Lexi.


Once the carpenter started laying the timber boards the deck was built pretty quickly.

A trap door was also made with a staircase going down underneath to access under the house which we can use for storage and to access the house for any plumbing or other maintenance needs. A lid was made for the trap door with a flush handle fitted to lift it up. The trap door was my clever idea and I think it's a great addition and the workmanship is seamless you can hardly notice it's there!


So that's it - the deck is done!


Next we need to oil and seal the timber deck to protect it and as mentioned I'll be writing a DIY How to oil a timber deck blog post using some awesome outdoor products from Cabot's just as soon as we've done this (our next DIY weekend project)!

The next project underway is the carpenter building a patio over the top of the deck which I'll share in a separate blog post very soon.

Do you have a deck? 
What deck material did you use - natural timber or a composite material? 

Sharing with link parties:
Curly Crafty Mom - The Creative Corner
The Dedicated House - Make It Pretty Monday
Savvy Southern Style - Wow Us Wednesdays


 photo F0F68C01A59FABD46732FC15E1D8816D_zpsc6047f2f.png

For exclusive extras and daily updates ... follow Jarrah Jungle on Facebook, Instagram and Twitter


[All images my own]

Pin It Now!