
With my latest obsession with my Happy Planner and wanting my craft room to be a creative space I have been inspired to give my craft room a spring clean and tidy up.
For under $50 and a few hours over the long weekend I created a very organised and stylish wrapping station and I also made my own greeting card gift box which I am completely in love with!

Now there are lots of before photos here along the way so you can see for yourself how much of an improvement proper storage has made.
My gift wrapping supplies were a hot mess stored in open baskets, everything was just tossed in there and it wasn't working for me, it looked messy and I could never find anything. It was safe to say I had well and truly out-grown my wrapping station as it was!

A weekend trip to Kmart and I loaded up the trolley with some great storage products. These gorgeous blue rattan style storage tubs with lids and a few medium and small size baskets (the drawer inserts I'll be sharing in a separate blog post about organising my craft supplies).
The flat and square tubs are $8 each (I got 5), the medium baskets $2.25 (for a set of 2) and small baskets $2.25 (for a set of 4) - I spent a grand total of $44.50 (see cost breakdown at the bottom of the page).


I sorted through each basket, throwing out anything damaged or I knew I wouldn't use and packed them neatly into the tubs.


Sheets and scraps of wrapping paper sit nicely in the medium tub and makes it a million times easier to see what I have so that I don't keep buying wrapping paper when I don't need to!
I also store leftover wallpaper in here as it's great to use for card making or gift wrapping.


I also did a separate smaller tub for bottle gift bags and material sacks and bags.


The ribbons, string and gift toppers were all kept organised inside the medium and small baskets.
The baskets then sit inside the large tub perfectly.


So I know what's in the tubs I stuck some Avery removable labels to the front ....
From the bottom to top there is: Boxes, Bags, Ribbon, Bags and Wrap paper.
From the bottom to top there is: Boxes, Bags, Ribbon, Bags and Wrap paper.


I also keep my leftover wallpaper rolls and postal tubes here.


Now as for my greeting cards and gift tags these were all dumped in a drawer and I could never find anything.
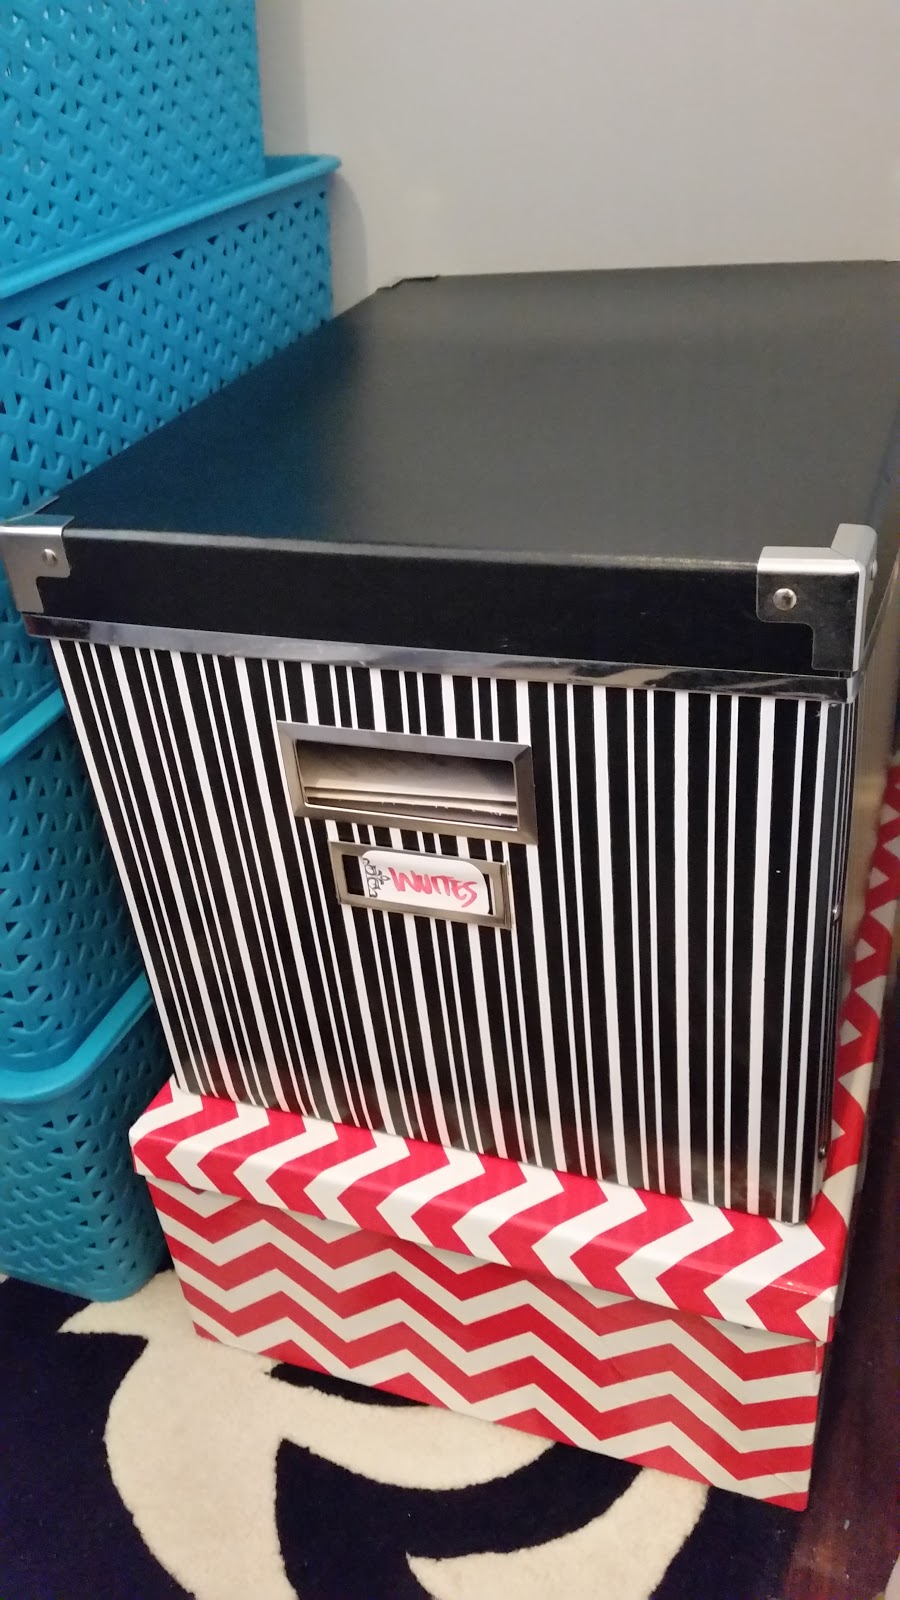
I saw this fabulous idea from I Heart Organising for greeting card storage in a box - but I needed to find a box tall enough to store the cards with the lid on to keep the cards from getting dusty and damaged.
I bought some Ikea boxes over 5 years but never assembled them and so I put Mr P to work (bribed with a beer and watching footy on the telly!) to put the boxes together for me. Turns out they are the perfect size, plenty of height to fit even the tallest of cards and the box is really quite strong too - not to mention the adorable stripes!


To create the greeting card storage box I made my own dividers by cutting some black card in half, adding a post-it note tab and writing on the tab the category of card.
Then I sorted the cards into each category and put them into the box with the dividers between them.
As well as card category sections there is a section for envelopes, DIY blank cards for my card making and a section for gift lists where I keep a list of all Birthday and Christmas gifts given including the budget as it makes buying gifts each year a lot easier as I know what I've given previously.
As well as card category sections there is a section for envelopes, DIY blank cards for my card making and a section for gift lists where I keep a list of all Birthday and Christmas gifts given including the budget as it makes buying gifts each year a lot easier as I know what I've given previously.


This was so easy to make and has made such an impact on being organised - for a simple project it has made the world of difference for a card lover like myself as I can see at a glance what cards I have and what I need more of.
The best bit is it cost just $3 to make (for the card) as the box and tabs I already had.
The best bit is it cost just $3 to make (for the card) as the box and tabs I already had.

Finally, I have stored all my invitation products like labels, invites, etc (mostly leftover from my engagement stationary and wedding invitations) in the other Ikea box.
The red/white box on the bottom has more boxes inside and will be used to give a gift in eventually!


I am so happy with my craft room makeover and so excited to use my wrapping station.
What's even better is that I didn't need to spend a lot of money to get organised and this whole set up with the wrapping station and greeting card box cost less me than $50.
What's even better is that I didn't need to spend a lot of money to get organised and this whole set up with the wrapping station and greeting card box cost less me than $50.
Cost breakdown:
3 x flat rattan style tubs, Kmart $24
2 x medium rattan style tubs, Kmart $16
Medium basket set of 2, Kmart $2.25
Small basket set of 4, Kmart $2.25
Card to make dividers, Discount store $3
Post it note tabs, already had
2 x Ikea boxes, already had
Basket and bin for wrapping papers, already had
Avery labels, already had
Total: $47.50
Sharing with link parties:
The Dedicated House - Make It Pretty Monday + Before And After Wednesday
Curly Crafty Mom - The Creative Corner
Savvy Southern Style - Wow Us Wednesdays
The Plumbette - Home Improvement Thursday

If you are a fellow crafter and join Blitsy a one stop shop for discounted craft supplies and make a first time purchase it would be awesome if you use my referral code HERE when you sign up - you will get great discounts and I get a $10 reward to spend on my creative obsession so I can share more posts like this with you guys! Thank you!!

[All images my own]
Pin It Now!
Love this! I really need to make myself a card box like that, so I am not running to the store last minute for cards! I love the color of those tubs!
ReplyDeleteCarrie
curlycraftymom.com
The card box was so easy it took about 15 minutes and I have used it already I just love it. You could use any box you have at home or if you do buy one get a tall one so you can keep the lid on to protect the cards :)
DeleteFabulous! Claudia x
ReplyDeleteNot bad for a crafternoon hey Claudia! x
DeleteThe organised goddess inside me is drooling at all that labelling, so good!
ReplyDeleteI know right! I thought I was finished but then I realised they needed labels so I could see what was inside ;)
DeleteLove this organisation, oh and good old Kmart for the storage goodies.
ReplyDeleteKmart has so many great goodies in stores now and so cheap too!
DeleteI love this! You've inspired me.
ReplyDeleteThat's what I want to hear! Thanks Leanne x
DeleteLove it! I'm going to show my daughter and insist she finally get around to getting her craft and jewellery station sorted, so I'm not finding it from one end of the house to the other.
ReplyDelete