Related Posts Plugin for WordPress, Blogger...

Tuesday, August 21, 2012

Interior Design Course: Week 2

Here's a recap of what I learnt in Week 2 of the Interior Design course


WEEK 2
Flooring and Lighting
Types and Applications of Floor Treatments
Types and Applications of Lighting

In the Flooring session there was a lot of talk about the different types of flooring and the pros and cons for each - we covered floorboards (my favourite), tiles and carpets. We also went into concrete floors, stone, vinyl and the old faithful cork. There are so many choices and each have good and bad qualities.


We went for a walking tour around the Home Expo centre to look at the different types of flooring. There is nothing better than being able to stand and touch and see flooring up close, compared to viewing paper samples of a product. Never commit to a product by a paper sample (says she who picked a paint colour from a computer screen!). With flooring you have to stand on it and imagine how it will work in your home with your kids, pets and furniture. You need to think about how it will wear, how often you can clean it, and how long it will last you. 


We then had an exercise of drawing and colouring in a floor using shades of colours that you see in the floor. I picked jarrah floorboards (of course!) and picked up colours of red, orange and brown.


Next we moved onto lighting and all the different types of lighting and where they should be used. The most efficient choice of bulbs for leaving lamps on all night, new types of led lighting for kitchens which take up no room and don't get hot, and using pendants in proportion so they aren't too big or small for the area.

I have pretty much sorted the lighting in my home and besides the disastrous high hanging pendant in my living room I'm pretty happy with my light choices so far. The kitchen however will need a lot of planning to get right with  proper lighting under benches for chopping and cooking. I absolutely love the dramatic bubble type chandeliers and want to build a two story house just so I can hang one in the stairwell!


The lighting homework was to cut out all the different types of lighting - General lighting, Spot lighting, Task lighting, Down lighting and Decorative lighting


I also asked about the landscaping section that was missed last week and apparently there are only notes in our files but no slides to look at because there's not enough time to cover it all. They run a separate course on landscaping that covers outdoors in more detail so I might be tempted to go to that as we have the entire front house to landscape and design, as well as a big backyard.

Week 1 you can read about here
Week 3 is all about Kitchens, Bathrooms and Laundries

[First image my own and homework floors and lighting images my own
All other images from Home Base Expo - Stairs here, Timber Floor here, Epoxy Floor here, Stone Floor here, Travertine here, Lights 1 here, Lights 2 here, Skylight here]


Pin It Now!

Sunday, August 19, 2012

My Stripes Were Sabotaged

You know how excited I was last weekend about finally getting my stripe on the entrance wall


I even got featured today over at Joy 2 Journey's Show us What You Did party (thanks Bj!)


But then my stripes were sabotaged by a certain someone not mentioning any names (Mr P!) who knocked the wall carrying something out the front door and took out a massive chunk of the plaster smack bang in the middle of my stripe.

He quickly filled it with some concrete filler, sorry there isn't a before photo but I was too busy crying! Yes I was a sook but I worked so hard on those stripes and was so proud of them for the wall to be damaged only 1 week after I finished was pretty upsetting.


But what can you do?
Accidents happen and shit happens too!

I've just got to get over it and not dwell on it. So  now I've got to figure out how to fix it. I can't do one stripe because the hole has gone over both coloured stripes so I'm thinking about bringing in a third stripe. Not sure yet. Maybe a project for next weekend when I'm feeling less angry and less like a sooky lala!


[All images my own]

Pin It Now!

Friday, August 17, 2012

Fridays Letters - Dear Wild Fig

It's Friday yippee! Which means it's time for Fridays Letters link up with Adventures of Newlyweds. Why don't you head on over here and join in the fun go on you know you want to!

I'm imagining I am writing this weeks letters at this quirky writing desk sitting in that big comfy chair with a Pimms and Lemonade.


Dear Wild Fig - Your offer of a free bottle of bubbles for a table of girls celebrating a Birthday is going to be very well received tonight!

Dear Learning New Things - Computer course and Interior Design course are filling my brain this week and I'm loving learning new things.

Dear Roof Colour - I have 4 painted tiles at home to choose your colour from light/medium/dark and extra dark grey. Such a huge decision to make I hope I get it right because you are finally being painted next week (not by me thank goodness!)

Dear Winter Hats - Your chilly mornings are slowly being replaced by sunshine with Spring only a few weeks away. I need to get more wear out of my warm hats before they're put in the wardrobe for another year!

Dear Little Punk - Why did you throw a concrete slab on my car bonnet Saturday night? I was asleep inside and you were outside damaging my property. Does it make you feel like a bigger man? Because it makes you look like a little punk! I hope one day someone does something to your hard earned property for no reason at all. Then you'll know what it feels like.

Dear Weekend - I will not be painting or renovating for the first time in forever! I will be catching up with friends, going to the Markets, cooking a pot luck dish for my besties Birthday, celebrating said friends Birthday Friday and Saturday night, sleeping in and nursing a hangover. Can't wait :)

Photobucket

[Image via my Pinterest]

Pin It Now!

Wednesday, August 15, 2012

Life Is An Adventure

It must be the one month countdown until my cruise holiday making me feel a little adventurous today


I hope everyone is having an adventurous week and if not why not buy a different brand of loo paper, pick up a new book, drive a different way home, ask a guy out, go dancing, wear sequins (in the day time!), learn something new, eat something you've never tried before ... the possibilities are endless!

Routine can become pretty boring live each day like it's an adventure!


[Images via my pinterest]

Pin It Now!

Monday, August 13, 2012

Interior Design Course: Week 1

Here's a recap of what I learnt at the Interior Design Course I started last week


WEEK 1
Building Design and Planning
Reading and Amending House Plans
Identifying Housing Styles
Landscaping

The building design and planning stages is where it all begins so take your time to pick colours and what you want the builders to do and what you'll organise yourself. You can then ask them to take services off the contract and reduce the quote if you think you can get a better deal elsewhere (I can see myself doing this if I build).

Building companies want your money so they are going to push you into signing but the fact is they need to be patient because there is no way you can make such important decisions on the spot. Don't sign the contracts until you're ready and happy with the choices you've made.


We viewed house plans that were changed 3 times and how the house was redrawn, kitchen appliances moved, doors and windows changed etc. You can still see where improvements can be made to make the home more functional and I guess this is where planning and drawing a house at the beginning plays such an important part - once you've signed off on it that's it so best to get this bit right no matter how long it takes.


We learnt how to increase a plan by 1:5 (although this moved a bit quickly for me, but I have my notes and worked it out in the homework). Once to scale you can play around with furniture placement to see how everything will fit in the room. I can see this would be particularly useful if you were building a new home you could see where your couch would go, coffee table, side table and you would then know where you'd need electricity for lamps and feature lighting etc.

This was the homework to increase a room to 1:5 and place furniture inside and do the wiring for electrical points and lighting. We also had to do a landscaping brief (although this wasn't actually covered in the class as we ran out of time) I used the information in the file and my zillions of magazines to come up with something. I hope the landscaping is covered in the next session as I'll be pretty disappointed if it isn't seems as though planning the front design is pretty high on my to do list.


Lastly, we covered all the different house styles and why its important when renovating that you stick to the same theme as the home - don't renovate an old home and make it totally modern - keep some of the features of the home and renovate with a nod to the old and the new. This is harder said than done as of course I like the look of modern but I am being careful not to make our home too modern on the exterior - trying to keep it classic (which includes using cream not lime!) - I can always have fun with modern decor on the inside.

My favourite older style of home is Colonial which have the big bay windows


My favourite modern home is the Balinese Resort with the big grand entrances
and lots of outdoor living spaces


The ole Jarrah Jungle house is the Pre War style. Apparently it's an easy one to renovate - new roof, render the bricks and put in a high fence and hey presto! Hmmm we seem to be doing exactly that!

Our house before


Our house now rendered ... new roof and fence coming soon!


I can now clearly see how there is a process for all these things from the very beginning and planning everything down to your furniture placement and the style of home that you love so you can follow this through in your design.

Week 2 is all about floors and lighting

 
[My own images - file 1, file 2, file 3, our house before and now]

Pin It Now!

Sunday, August 12, 2012

I Finally Got My Stripe On

As I drooled about recently I absolutely love stripes and decided I needed to stop buying striped items of clothing and instead get out the paint brushes and created a bit of stripes in the home.

I really wanted to make a statement on the entrance wall a sign that said 'Welcome to the Jarrah Jungle' a home of personality and fun but instead it looked like this

BEFORE
When we moved in it was a purple suede wall


DURING
Then we painted it a light grey Mountain Peak


AFTER
And then I got my stripe on woot woot


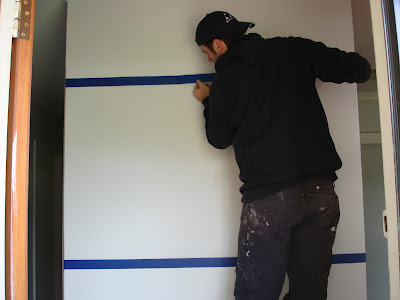
So I fluttered my eyelashes at Mr P and he measured and taped up the lines for me. Here's a tip, don't measure from the top of the wall and presume the wall is straight enough for you to draw a straight line. In any old house the walls are going to be slightly off so while you can measure and make marks from the top, always use a spirit level to draw the actual line to ensure it will be straight.


Now tape under the line so the paint will cover your pencil lines. Don't skimp on the quality of the tape you buy make sure you use a good quality painters tape and really press the tape down to stop any paint bleeding through.


Now it was my turn to do some work! I used the leftover paint from the media wall and did one big wide stripe. If felt so good to finally get my stripe on!


I was going to leave it at that but once I'd done one stripe I wanted to do another one. My excuse was there was a chip out of the bottom of the wall so I decided to hide it with a stripe. I filled the chip with filler, sanded it smooth and then got Mr P to measure and rule me another stripe (thanks babe!)


I painted 3 coats on each stripe and waited about 2 hours in between coats. So I could keep using the same roller I wrapped it in cling film and put it in a plastic bag and put it in the fridge. I wiped the tray clean between coats but wrapping the roller definitely saves on time washing it out. 


I peeled the tape off about 20 minutes after the final coat - you definitely don't want to wait for the paint to dry or you'll risk pulling the paint off with the tape. There's something exhilarating about peeling the tape off at the end it's like the final reveal and it's exciting and scary at the same time seeing your finished product and hoping like buggery it looks good!


Ta da!

I want to say that I'm proud of myself for doing this stripe project because even though Mr P did the hard work of measuring it up, I got the paint out and painted, laid the drop sheets and cleaned up, etc and usually I'm keeping busy with domestic things while Mr P does the renovation work so I'm so happy that I got involved and did this.

All by myselfffffffffffffffffffffff (aka Bridget Jones style) well kind of!

Now it really is screaming for some artwork and that thick stripe is the perfect backdrop for some wall art,  now I just need to find the right piece to hang up.

Sharing with Link Party Joy 2 Journey

[All images my own]

Pin It Now!